Welcome to the tutorial! We’ll be building a small, but feature-rich app that lets you keep track of your contacts. We expect it to take between 60-90m if you’re following along.
This tutorial is largely copied from the React Router tutorial, with bits and pieces copied from the WordPress and WP-API documentation. A Remix, if you will. Changes were made to accommodate the WordPress backend we are using instead of the mock backend in the original tutorial. Furthermore, we omitted a few paragraphs that didn’t seem relevant to ReactPress.
We’ll start from scratch so that even if you are a React developer who never worked with WordPress, you can follow along.
Every ReactPress application has three parts:
- Setting up the WordPress backend:
- Install WordPress on your local machine or a web server.
- Setup the data you need in the WordPress admin (setting up content types or just adding entries of existing content types).
- Building the React frontend:
- Create a new React project with create-react-app (other options will follow soon).
- Install and import React Router and WP-API into your project.
- Create components to interact with the items fetched from the WordPress REST API.
- Integrating the frontend and backend:
- Send GET requests to the WordPress REST API to retrieve data and update the state of your React app.
- Send POST requests to the WordPress REST API to update.
- Authenticate the user with X-WP-Nonce for added security.
This is just a high-level overview of building a React app that integrates with WordPress through the REST API. There are many details to consider and implement, such as error handling, UI design, and testing.
Before we start: I want to define 3 environments for this tutorial:
- DEV – React development server with instant reloading created by create-react-app.
- LOCAL – the local WordPress installation on your machine.
- PROD – the public live WordPress server where we deploy our React app.
Let’s start with the tutorial.
👉 Every time you see this, it means you need to do something in the app!
The rest is just there for your information and deeper understanding. Let’s get to it.
Setup
WordPress
We will be using LocalWP for our LOCAL WordPress backend.
👉️ Download and install LocalWP
Head over to the LocalWP-Website and download and install the right LocalWP version for your operating system.
👉️ Start Local and create a new site
Open LocalWP and click on the big +, “Create a new site“, give your site the name “RP Tutorial” and add your first user. For any other setting, the default value should be fine.
👉️ Install Theme and create demo home page
Navigate to Appearance > Themes, click the “Add New” button and enter “HopeUI“, install and activate it.
👉️ Install ReactPress
Go to Plugins > Add New, enter “ReactPress” in the search field, install and activate ReactPress.
Finally, navigate to the ReactPress page in the admin and copy the path to the apps directory, where we will create our React app. It should look like this /path/to/LocalWP/rp-tutorial/app/public/wp-content/reactpress/apps
So now our WordPress LOCAL system is ready to go. Let us set up our React app.
React App
👉️ Open up your terminal and bootstrap a new React app with create-react-app:
cd [/path/to]/LocalWP/rp-tutorial/app/public/wp-content/reactpress/apps
npx create-vite contacts --template react
# follow prompts
cd contacts
npm install
npm install --save react-router-dom wpapi
Back in our WordPress, reload the ReactPress page. You should see a new app “contacts“. Click on “Add Page“, enter “Contacts” into the input, click on “Create Contacts” and then click “Create Page“.
ReactPress will now create a new WordPress page for you. If you visit the page now, it will be empty. Let’s change that.
Go back to the terminal and build your app for the first time.
npm run build
Now reload the empty “Contacts” page and you should see the newly created React app.

ReactPress ships with two page templates: “Canvas” and “Full Width“. “Canvas” is a blank page that dodges your current theme, while “Full Width” is a normal page template that fits right between the site’s header and footer. “Full Width” is the default template when creating a new page via the ReactPress admin interface. You can, however, use any page template you want by simply changing the page settings.
If you use a WordPress block-theme with Full Site Editing, the default ReactPress page templates don’t work very well. In this case, it is best to use a theme template and tweak it to your needs.
A first change.
If you look at our newly created page, you see a big fat page title with breadcrumbs. While this may be beneficial on normal content pages, it is irritating above our React app. While you could disable the page header in the HopeUI settings, other themes may not have such an option. For that reason, we will use CSS to hide the page header.
Start your React DEV server in the terminal and open the React app in your favorite editor:
npm run dev
The running DEV server should show a page that looks like the WordPress page including the WordPress specific styles.
If you change the your LOCAL WordPress you can update the styles of DEV environment from the ReactPress admin to reflect that.
Open index.css and remove all content and add
.hopeui_style-breadcrumb {
  display: none !important;
}
The effect is two-fold. First, the React app uses the same fonts as your WordPress site now, so that the React app doesn’t look like a foreign object and second, we hide the page header above our React app and only there.
Let’s build the app again and refresh the WordPress page on http://rp-tutorial.local/contacts/. Ta-da, we have a running React app without any annoying header.

We will use the Bootstrap classes from the HopeUI theme where we can in this tutorial. On some occasions, we need to write some custom CSS.
All you need in the src folder are main.jsx, and index.css. You can delete anything else (like App.js and assets, etc.).
Adding a Router (Let’s get started)
👉 Delete unused files in src/ so all you have left are these:
src
├── index.css
└── main.jsx
If your app is running, it might blow up momentarily, just keep going 😋. And with that, we’re ready to get started!
Adding a Router
The first thing to do is to create a Hash Router and configure our first route. This will enable client-side routing for our web app.
We use <HashRouter> because it doesn’t interfere with WordPress’s routing and makes our life much easier. While ReactPress gives you the ability to use the standard <BrowserRouter>, it comes with certain limitations. Learn more about Client-side routing with ReactPress.
The main.jsx file is the entry point. Open it up, and we’ll add React Router.
👉 Create and render a hash router in main.jsx
import React from 'react'
import ReactDOM from 'react-dom/client'
import { createHashRouter, RouterProvider } from 'react-router-dom'
import './index.css'

const router = createHashRouter([
  { path: '/', element: <div>Hello WordPress!</div> },
])

const root = ReactDOM.createRoot(document.getElementById('root'))
root.render(
  <React.StrictMode>
    <RouterProvider router={router} />
  </React.StrictMode>
)
This first route is called the “root route” since the rest of our routes will render inside of it. It will serve as the root layout of the UI, we’ll have nested layouts as we get farther along.
The Root Route
Let’s add the global layout for this app.
👉 Create src/routes and src/routes/root.jsx
mkdir src/routes
touch src/routes/root.jsx
(If you don’t want to be a command line nerd, use your editor instead of those commands 🤓)
👉 Create the root layout component
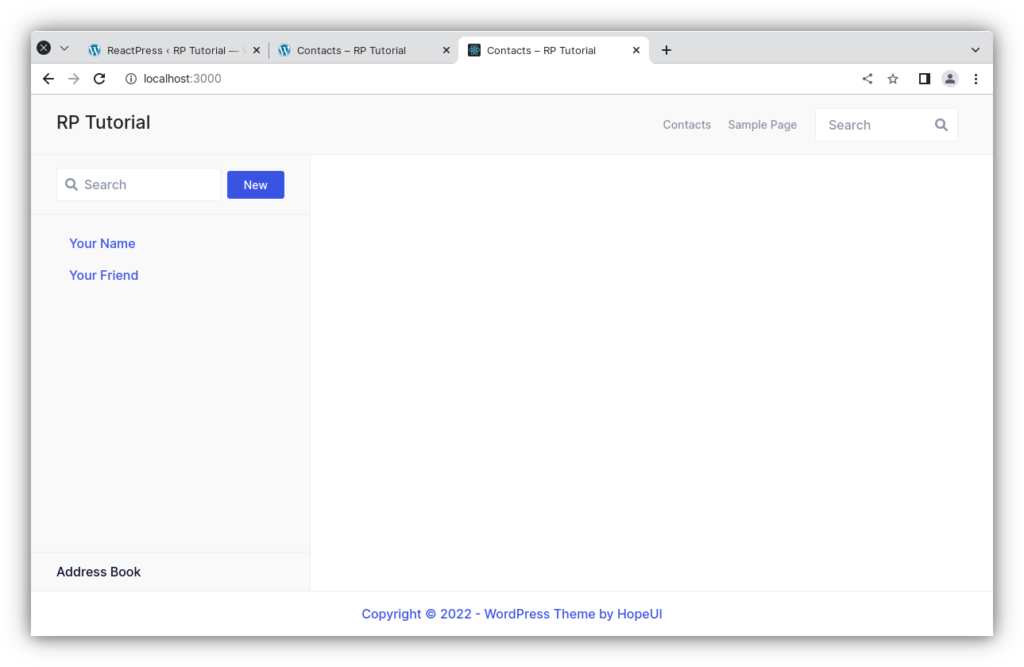
export default function Root() {
  return (
    <>
      <div id="sidebar">
        <h1>Address Book</h1>
        <div>
          <form
            className="d-flex search-form"
            id="search-form"
            method="post"
            role="search"
          >
            <i className="fa fa-search" aria-hidden="true"></i>
            <input
              id="q"
              aria-label="Search contacts"
              placeholder="Search"
              type="search"
              name="q"
            />
            <div className="sr-only" aria-live="polite"></div>
          </form>
          <form method="post">
            <button className="btn hopeui_style-button" type="submit">
              New
            </button>
          </form>
        </div>
        <nav>
          <ul className="nav nav-pills nav-fill flex-column">
            <li className="nav-item text-start">
              <a className="nav-link" href={`#/contacts/1`}>
                Your Name
              </a>
            </li>
            <li className="nav-item text-start">
              <a className="nav-link" href={`#/contacts/2`}>
                Your Friend
              </a>
            </li>
          </ul>
        </nav>
      </div>
      <div id="detail"></div>
    </>
  )
}
We create a basic layout for our contacts app. Note that we are reusing plenty of CSS classes that are not defined in our app. These are CSS classes that are inherited from the Hero UI theme. Which in turn makes heavy use of Bootstrap 5.
Copy & paste the following CSS to our index.css:
.hopeui_style-breadcrumb {
  display: none !important;
}

#page {
  display: flex;
  flex-direction: column;
  min-height: 100vh;
}
/* In case the user logged in and has the admin bar activated */
.admin-bar #page {
  min-height: calc(100vh - 32px); /* WP's admin bar height is 32px */
}

#root {
  --border: 0.063em solid var(--border-color-light);
  border-top: var(--border);
  display: flex;
  flex-grow: 1;
  width: 100%;
}

#sidebar {
  width: 22rem;
  border-right: var(--border);
  display: flex;
  flex-direction: column;
}

#sidebar > * {
  padding-left: 2rem;
  padding-right: 2rem;
}

#sidebar h1 {
  font-size: 1rem;
  font-weight: 500;
  display: flex;
  align-items: center;
  margin: 0;
  padding: 1rem 2rem;
  border-top: var(--border);
  order: 1;
  line-height: 1;
}

#sidebar > div {
  display: flex;
  align-items: center;
  gap: 0.5rem;
  padding-top: 1rem;
  padding-bottom: 1rem;
  border-bottom: var(--border);
}

#search-form input {
  padding-left: 2.125rem;
  padding-right: 0.5rem;
}

#sidebar > div form button {
  min-width: fit-content;
}

#sidebar > div form i {
  position: absolute;
  z-index: 2;
  display: block;
  width: 2.375rem;
  height: 2.375rem;
  line-height: 2.375rem;
  padding-top: 0.125rem;
  text-align: center;
  pointer-events: none;
}

#sidebar nav {
  flex: 1;
  overflow: auto;
  padding-top: 1rem;
}

#sidebar nav a:hover {
  background: var(--color-theme-secondary-light);
}

#detail {
  background-color: var(--color-theme-white);
  flex: 1;
  padding: 2rem 4rem;
  width: 100%;
}
👉 Set <Root> as the root route’s element
/* existing imports */
import Root from './routes/root'

const router = createHashRouter([{ path: '/', element: <Root /> }])

const root = ReactDOM.createRoot(document.getElementById('root'))
root.render(
  <React.StrictMode>
    <RouterProvider router={router} />
  </React.StrictMode>
)
The app should look something like this now.
Handling Not Found Errors
It’s always a good idea to know how your app responds to errors early in the project because we all write far more bugs than features when building a new app! Not only will your users get a good experience when this happens, but it helps you during development as well.
Anytime your app throws an error while rendering, loading data, or performing data mutations, React Router will catch it and render an error screen. Let’s make our own error page.
👉 Create an error page component
touch src/error-page.jsx
import { useRouteError } from 'react-router-dom'

export default function ErrorPage() {
  const error = useRouteError()
  console.error(error)

  return (
    <div
      className="align-items-center bg-white d-flex flex-column flex-grow-1 justify-content-center"
      id="error-page"
    >
      <h1 className="mt-0">Oops!</h1>
      <p>Sorry, an unexpected error has occurred.</p>
      <p>
        <i>{error.statusText || error.message}</i>
      </p>
    </div>
  )
}
👉 Set the <ErrorPage> as the errorElement on the root route
/* previous imports */
import ErrorPage from './error-page'

const router = createHashRouter([
  {
    path: '/',
    element: <Root />,
    errorElement: <ErrorPage />,
  },
])

const root = ReactDOM.createRoot(document.getElementById('root'))
root.render(
  <React.StrictMode>
    <RouterProvider router={router} />
  </React.StrictMode>
)
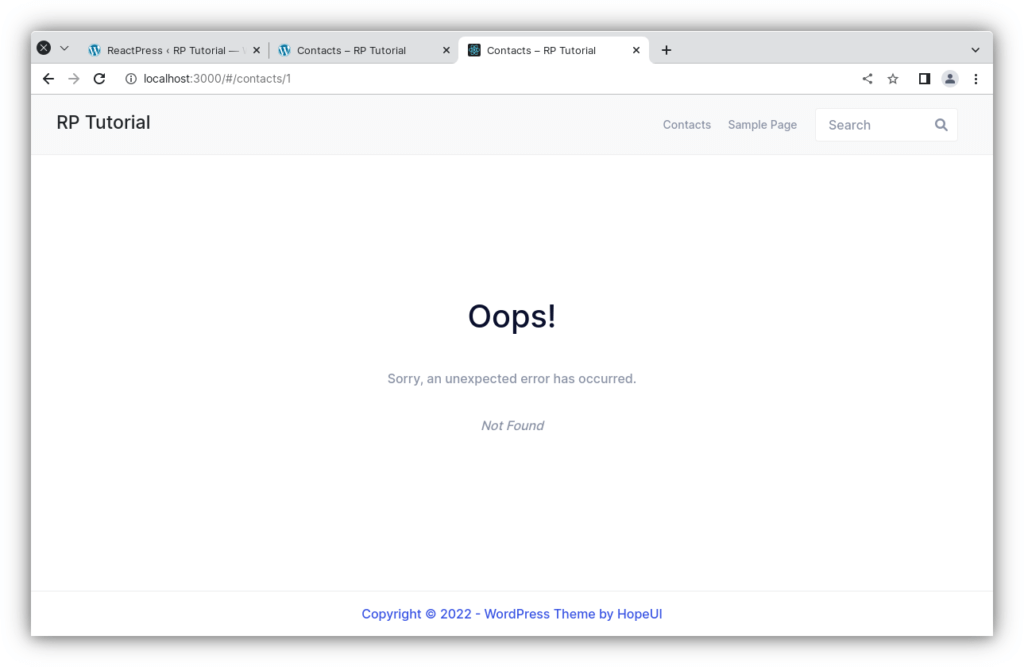
The error page should now look like this:
Note that useRouteError provides the error that was thrown. When the user navigates to routes that don’t exist, you’ll get an error response with a “Not Found” statusText. We’ll see some other errors later in the tutorial and discuss them more.
For now, it’s enough to know that pretty much all of your errors will now be handled by this page instead of infinite spinners, unresponsive pages, or blank screens 🙌
The Contact Route UI
Instead of a 404 “Not Found” page, we want to actually render something at the URLs we’ve linked to. For that, we need to make a new route.
👉 Create the contact route module
touch src/routes/contact.jsx
👉 Add the contact component UI
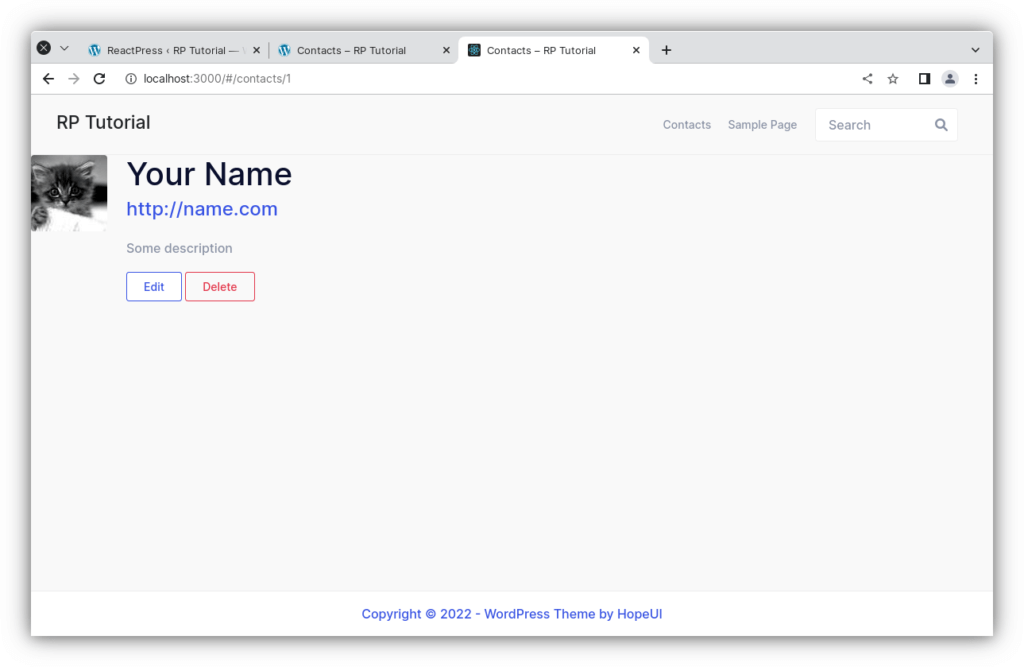
It’s just a bunch of elements, feel free to copy/paste.
import { Form } from 'react-router-dom'
export default function Contact() {
const contact = {
name: 'Your Name',
avatar_urls: {'96': 'https://placebear.com/g/96/96'},
url: 'http://name.com',
description: 'Some description',
favorite: true,
}
return (
<div id="contact" className="d-flex">
<div className="pe-4">
<img
alt={`${contact?.name} of avatar`}
className="rounded"
height={96}
src={contact?.avatar_urls['96'] || null}
width={96}
/>
</div>
<div>
<h1 className="d-flex display-6 my-0">
{contact.name ? (
<>
{contact.name}
</>
) : (
<i>No Name</i>
)}
</h1>
{contact.url && (
<p className="fs-4 my-0">
<a target="_blank" href={contact.url} rel="noreferrer">
{contact.url}
</a>
</p>
)}
{contact.description && <p>{contact.description}</p>}
<div className="d-flex">
<Form action="edit">
<button className="btn btn-outline-primary" type="submit">
Edit
</button>
</Form>
<Form
method="post"
action="destroy"
onSubmit={(event) => {
if (
!window.confirm(
'Please confirm you want to delete this record.'
)
) {
event.preventDefault()
}
}}
>
<button className="btn btn-outline-danger" type="submit">
Delete
</button>
</Form>
</div>
</div>
</div>
)
}
Make the buttons fit better with HopeUI.
/* existing styles */
.btn {
  font-size: var(--font-size-normal);
  font-family: var(--highlight-font-family);
  letter-spacing: var(--letter-spacing);
  font-weight: var(--font-weight-medium);
  line-height: var(--font-line-height-body);
  border-radius: var(--box-border-radius);
  padding: 0.5em 1.5em;
  position: relative;
  display: inline-block;
  vertical-align: top;
  cursor: pointer;
  overflow: hidden;
  text-decoration: none;
  transition: all 0.5s ease-in-out;
  -moz-transition: all 0.5s ease-in-out;
  -ms-transition: all 0.5s ease-in-out;
  -o-transition: all 0.5s ease-in-out;
  -webkit-transition: all 0.5s ease-in-out;
}
.btn-primary {
  color: var(--color-theme-white);
  background-color: var(--color-theme-primary);
}
.btn-outline-primary {
  color: var(--color-theme-primary);
  background-color: var(--color-theme-white);
  border: 1px solid var(--color-theme-primary);
}

.btn-primary:hover,
.btn-outline-primary:hover {
  background: var(--color-theme-primary-dark);
  color: var(--color-theme-white);
}
Now that we’ve got a component, let’s hook it up to a new route.
👉 Import the contact component and create a new route
/* existing imports */
import Contact from "./routes/contact";

const router = createHashRouter([
  {
    path: "/",
    element: <Root />,
    errorElement: <ErrorPage />,
  },
  {
    path: "contacts/:contactId",
    element: <Contact />,
  },
]);

/* existing code */
Now if we click one of the links or visit /contacts/1 we get our new component!
Nested Routes
We want the contact component to render inside the <Root> layout like this.

We do it by making the contact route a child of the root route.
👉 Move the contacts route to be a child of the root route
const router = createHashRouter([
  {
    path: "/",
    element: <Root />,
    errorElement: <ErrorPage />,
    children: [
      {
        path: "contacts/:contactId",
        element: <Contact />,
      },
    ],
  },
]);
You’ll now see the root layout again, but a blank page on the right. We need to tell the root route where we want it to render its child routes. We do that with <Outlet>.
Find the <div id="detail"> and put an outlet inside
👉 Render an <Outlet>
import { Outlet } from "react-router-dom";

export default function Root() {
  return (
    <>
      {/* all the other elements */}
      <div id="detail">
        <Outlet />
      </div>
    </>
  );
}
Client Side Routing
You may or may not have noticed, but when we click the links in the sidebar, the browser is doing a full document request for the next URL instead of using React Router.
Client-side routing allows our app to update the URL without requesting another document from the server. Instead, the app can immediately render new UI. Let’s make it happen with <Link>.
👉 Change the sidebar <a href> to <Link to>
import { Link, Outlet } from 'react-router-dom'

export default function Root() {
  return (
    <>
      <div id="sidebar">
        {/* other elements */}

        <nav>
          <ul className="nav nav-pills nav-fill flex-column">
            <li className="nav-item text-start">
              <Link className="nav-link" to={`contacts/1`}>
                Your Name
              </Link>
            </li>
            <li className="nav-item text-start">
              <Link className="nav-link" to={`contacts/2`}>
                Your Friend
              </Link>
            </li>
          </ul>
        </nav>
      </div>

        {/* other elements */}
      </div>
    </>
  )
}
You can open the network tab in the browser devtools to see that it’s not requesting documents anymore.
Using the REST API
If you want your React app to interact with your WordPress site, you need to use the WordPress REST API (or you could use a GraphQL plugin).
Using the WordPress REST API, you can create a React app to provide an entirely new admin experience for WordPress, build a brand new front-end experience, or bring your WordPress content into completely separate applications.
Before we can load real data in our app, we must authorize our REST API requests so that you can create, update and delete your data.
The standard authentication for the WordPress REST API is a technique called nonces to avoid CSRF issues. This prevents other sites from forcing you to perform actions without explicitly intending to do so. Nonces require slightly special handling for the API. We will use this technique on LOCAL and PROD.
However, on DEV we can’t use nonces, so we will have to fall back on app passwords during development.
In the WordPress admin navigate to Users > Profile, scroll down and create a new application password. Copy it and use it in the following listing instead of the XXXX...X.
👉 Create the API module in src/api.js
touch src/api.js
/* global reactPress */

import WPAPI from 'wpapi'
window.global = window // needed because of Vite

const wp = new WPAPI(
  !import.meta.env.PROD
    ? {
        endpoint: reactPress.api.rest_url,
        username: 'admin',
        password: 'XXXX XXXX XXXX XXXX XXXX',
      }
    : { endpoint: reactPress.api.rest_url, nonce: reactPress.api.nonce }
)

export async function getContacts(q = '') {
  try {
    const users = await wp.users().search(q)
    return users.filter(user => user.id !== 1) // we don't want the admin user
  } catch (error) {
    console.error(error)
    return []
  }
}
First, we initialize the WPAPI client with the right authentication method (app password on DEV, nonce on LOCAL and PROD).
For convenience, ReactPress provides a global JavaScript Object reactPress with information about the API and the current user.
Then we retrieve the users. The WPAPI client provides different request methods, one of them wp.users(). It queries all resources within the /users endpoints.
The request object can be further refined with chaining methods, and/or sent to the server via .get(), .create(), .update(), .delete().
Furthermore, WPAPI provides parameter shortcuts for many of the most common parameters, like search. To learn more about WPAPI visit the Using the Client page.
Loading Data
URL segments, layouts, and data are more often than not coupled (tripled?) together. We can see it in this app already:
| URL Segment | Component | Data |
|---|---|---|
| / | <Root> | list of contacts |
| contacts/:id | <Contact> | individual contact |
Because of this natural coupling, React Router has data conventions to get data into your route components easily.
There are two APIs we’ll be using to load data, loader and useLoaderData. First we’ll create and export a loader function in the root module, then we’ll hook it up to the route. Finally, we’ll access and render the data.
👉 Export a loader from root.jsx
import { Outlet, Link } from "react-router-dom";
import { getContacts } from "../api";

export async function loader() {
  const contacts = await getContacts();
  return { contacts };
}
👉 Configure the loader on the route
/* other imports */
import Root, { loader as rootLoader } from "./routes/root";

const router = createHashRouter([
  {
    path: "/",
    element: <Root />,
    errorElement: <ErrorPage />,
    loader: rootLoader,
    children: [
      {
        path: "contacts/:contactId",
        element: <Contact />,
      },
    ],
  },
]);
👉 Access and render the data
import {
  Outlet,
  Link,
  useLoaderData,
} from "react-router-dom";
import { getContacts } from "../api";

/* other code */

export default function Root() {
  const { contacts } = useLoaderData();
  return (
    <>
      <div id="sidebar">
        <h1>Address Book</h1>
        {/* other code */}

        <nav>
          {contacts.length ? (
            <ul className="nav nav-pills nav-fill flex-column">
              {contacts.map(contact => (
                <li key={contact.id} className="nav-item text-start">
                  <Link className="nav-link" to={`contacts/${contact.id}`}>
                    {contact.name ? <>{contact.name}</> : <i>No Name</i>}{' '}
                  </Link>
                </li>
              ))}
            </ul>
          ) : (
            <p>
              <i>No contacts</i>
            </p>
          )}
        </nav>

        {/* other code */}
      </div>
    </>
  );
}
That’s it! React Router will now automatically keep that data in sync with your UI. We don’t have any data yet, so you’re probably getting a blank list like this:

Data Writes + HTML Forms
We’ll create our first contact in a second, but first, let’s talk about HTML.
React Router emulates HTML Form navigation as the data mutation primitive, according to web development before the JavaScript Cambrian explosion. It gives you the UX capabilities of client-rendered apps with the simplicity of the “old school” web model.
While unfamiliar to some web developers, HTML forms actually cause navigation in the browser, just like clicking a link. The only difference is in the request: links can only change the URL, while forms can also change the request method (GET vs POST) and the request body (POST form data).
Without client-side routing, the browser will serialize the form’s data automatically and send it to the server as the request body for POST, and as URLSearchParams for GET. React Router does the same thing, except instead of sending the request to the server, it uses client-side routing and sends it to a route action.
We can test this out by clicking the “New” button in our app. The app should blow up because the dev server isn’t configured to handle a POST request (it sends a 404, though it should probably be a 405 🤷).
Instead of sending that POST to the dev server to create a new contact, let’s use client-side routing instead.
Creating a First Contact
We’ll create new contacts by exporting an action in our root route, wiring it up to the route config, and changing our <form> to a React Router <Form>.
👉 Add API function createContact
export async function createContact(user) {
  try {
    const result = await wp.users().create(user)
    return result
  } catch (error) {
    console.error(error)
  }
}
👉 Create the action and change <form> to <Form>
import {
  Outlet,
  Link,
  useLoaderData,
  Form,
} from "react-router-dom";
import { createContact, getContacts } from '../api'

export async function action() {
  const contact = await createContact({
    username: 'test',
    email: 'test@example.com',
    first_name: 'Example',
    last_name: 'User',
    password: 'SECURE_PASS_NO1',
  })
  return { contact }
}

/* other code */

export default function Root() {
  const { contacts } = useLoaderData();
  return (
    <>
      <div id="sidebar">
        <h1>Address Book</h1>
        <div>
          {/* other code */}
          <Form method="post">
            <button className="btn hopeui_style-button" type="submit">New</button>
          </Form>
        </div>

        {/* other code */}
      </div>
    </>
  );
}
👉 Import and set the action on the route
/* other imports */

import Root, {
  loader as rootLoader,
  action as rootAction,
} from "./routes/root";

const router = createHashRouter([
  {
    path: "/",
    element: <Root />,
    errorElement: <ErrorPage />,
    loader: rootLoader,
    action: rootAction,
    children: [
      {
        path: "contacts/:contactId",
        element: <Contact />,
      },
    ],
  },
]);
That’s it! Go ahead and click the “New” button and you should see a new record pop into the list 🥳

The createContact function just creates a predefined user. It will only work once. We will create a more general solution later, promise!
🧐 Wait a sec … How did the sidebar update? Where did we call the
action? Where’s the code to refetch the data? Where areuseState,onSubmitanduseEffect?!
This is where the “old school web” programming model shows up. As we discussed earlier, <Form> prevents the browser from sending the request to the server and sends it to your route action instead. In web semantics, a POST usually means some data is changing. By convention, React Router uses this as a hint to automatically revalidate the data on the page after the action finishes. That means all of your useLoaderData hooks update and the UI stays in sync with your data automatically! Pretty cool.
URL Params in Loaders
👉 Click on the Example User record
We should be seeing our old static contact page again, with one difference: the URL now has a real ID for the record.

Reviewing the route config, the route looks like this:
[
  {
    path: "contacts/:contactId",
    element: <Contact />,
  },
];
Note the :contactId URL segment. The colon (:) has special meaning, turning it into a “dynamic segment”. Dynamic segments will match dynamic (changing) values in that position of the URL, like the contact ID. We call these values in the URL “URL Params”, or just “params” for short.
These params are passed to the loader with keys that match the dynamic segment. For example, our segment is named :contactId so the value will be passed as params.contactId.
These params are most often used to find a record by ID. Let’s try it out.
👉 Get a contact with the given ID
export async function getContact(id) {
  try {
    const user = wp.users().id(id)
    return user
  } catch (error) {
    console.error(error)
    return {}
  }
}
👉 Add a loader to the contact page and access data with useLoaderData
import { Form, useLoaderData } from "react-router-dom";
import { getContact } from "../api";

export async function loader({ params }) {
  return getContact(params.contactId);
}

export default function Contact() {
  const contact = useLoaderData();
  // existing code
}
👉 Configure the loader on the route
/* existing code */
import Contact, {
  loader as contactLoader,
} from "./routes/contact";

const router = createHashRouter([
  {
    path: "/",
    element: <Root />,
    errorElement: <ErrorPage />,
    loader: rootLoader,
    action: rootAction,
    children: [
      {
        path: "contacts/:contactId",
        element: <Contact />,
        loader: contactLoader,
      },
    ],
  },
]);

/* existing code */
Updating Data
Just like creating data, you update data with <Form>. Let’s make a new route at contacts/:contactId/edit. Again, we’ll start with the component and then wire it up to the route config.
👉 Use the context “edit” in getContact to get more properties
export async function getContact(id) {
  try {
    const user = wp.users().id(id).param('context', 'edit')
    return user
  } catch (error) {
    console.error(error)
    return {}
  }
}
👉 Create the edit component
touch src/routes/edit.jsx
👉 Add the edit page UI
Nothing we haven’t seen before, feel free to copy/paste:
import { Form, useLoaderData } from 'react-router-dom'

export default function EditContact() {
  const contact = useLoaderData()

  return (
    <Form className="row g-3" method="post" id="contact-form">
      <div className="col-md-6">
        <label htmlFor="first" className="form-label">
          First Name
        </label>
        <input
          className="form-control"
          defaultValue={contact.first_name}
          id="first"
          name="first_name"
          placeholder="First"
          type="text"
        />
      </div>
      <div className="col-md-6">
        <label htmlFor="last" className="form-label">
          Last Name
        </label>
        <input
          className="form-control"
          defaultValue={contact.last_name}
          id="last"
          placeholder="Last"
          type="text"
          name="last_name"
        />
      </div>
      <div className="col-12">
        <label htmlFor="url" className="form-label">
          Url
        </label>
        <input
          type="text"
          className="form-control"
          id="url"
          placeholder="https://example.com"
          defaultValue={contact.url}
          name="url"
        />
      </div>
      <div className="col-md-12">
        <label htmlFor="avatar" className="form-label">
          Avatar
        </label>
        <input
          type="text"
          className="form-control"
          id="avatar"
          defaultValue={contact?.avatar_urls[96]}
          name="avatar"
        />
      </div>
      <div className="col-md-12">
        <label htmlFor="description" className="form-label">
          Description
        </label>
        <textarea
          className="form-control"
          defaultValue={contact.description}
          id="description"
          rows={6}
          style={{ height: 'calc(5 * 2.5rem' }}
          name="description"
        />
      </div>
      <div className="col-12 d-flex gap-2">
        <button type="submit" className="btn btn-outline-primary">
          Save
        </button>
        <button type="button" className="btn btn-outline-secondary">
          Cancel
        </button>
      </div>
    </Form>
  )
}
/* existing styles */

textarea.form-control {
  color: var(--global-font-color);
}
👉 Add the new edit route
/* existing code */
import EditContact from "./routes/edit";

const router = createHashRouter([
  {
    path: "/",
    element: <Root />,
    errorElement: <ErrorPage />,
    loader: rootLoader,
    action: rootAction,
    children: [
      {
        path: "contacts/:contactId",
        element: <Contact />,
        loader: contactLoader,
      },
      {
        path: "contacts/:contactId/edit",
        element: <EditContact />,
        loader: contactLoader,
      },
    ],
  },
]);

/* existing code */
We want it to be rendered in the root route’s outlet, so we made it a sibling to the existing child route.
(You might note we reused Loader for this route. This is only because we’re being lazy in the tutorial. There is no reason to attempt to share loaders among routes, they usually have their own.)
Alright, clicking the “Edit” button gives us this new UI:
Updating Contacts with FormData
The edit route we just created already renders a form. All we need to do to update the record is wire up an action to the route. The form will post to the action and the data will be automatically revalidated.
👉 Add a new API function
/* existing code */

export async function updateContact(id, user) {
  try {
    const result = wp.users().id(id).update({
      ...user,
      name: `${user.first_name} ${user.last_name}`
    })
    return result
  } catch (error) {
    console.error(error)
  }
}

/* existing code */
👉 Add an action to the edit module
import {
  Form,
  useLoaderData,
  redirect,
} from "react-router-dom";
import { updateContact } from "../api";

export async function action({ request, params }) {
  const formData = await request.formData();
  const updates = Object.fromEntries(formData);
  await updateContact(params.contactId, updates)
  return redirect(`/contacts/${params.contactId}`);
}

/* existing code */
👉 Wire the action up to the route
/* existing code */
import EditContact, {
  action as editAction,
} from "./routes/edit";

const router = createHashRouter([
  {
    path: "/",
    element: <Root />,
    errorElement: <ErrorPage />,
    loader: rootLoader,
    action: rootAction,
    children: [
      {
        path: "contacts/:contactId",
        element: <Contact />,
        loader: contactLoader,
      },
      {
        path: "contacts/:contactId/edit",
        element: <EditContact />,
        loader: contactLoader,
        action: editAction,
      },
    ],
  },
]);

/* existing code */
Change the form, hit save, and you should see changes in your contacts. We can’t change our avatar currently. We will change that in a minute.
Mutation Discussion
😑 It worked, but I have no idea what is going on here…
Let’s dig in a bit…
Open up src/routes/edit.jsx and look at the form elements. Notice how they each have a name:
<input
  placeholder="First"
  aria-label="First name"
  type="text"
  name="first"
  defaultValue={contact.first}
/>
Without JavaScript, when a form is submitted, the browser will create FormData and set it as the body of the request when it sends it to the server. As mentioned before, React Router prevents that and sends the request to your action instead, including the FormData.
Each field in the form is accessible with formData.get(name). For example, given the input field from above, you could access the first and last names like this:
export async function action({ request, params }) {
  const formData = await request.formData();
  const firstName = formData.get("first_name");
  const lastName = formData.get("last_name");
  // ...
}
Since we have a handful of form fields, we used Object.fromEntries to collect them all into an object, which is exactly what our updateContact function wants.
const updates = Object.fromEntries(formData);
updates.first; // "Some"
updates.last; // "Name"
Aside from action, none of these APIs we’re discussing are provided by React Router: request, request.formData, Object.fromEntries are all provided by the web platform.
After we finished the action, note the redirect at the end:
export async function action({ request, params }) {
  const formData = await request.formData();
  const updates = Object.fromEntries(formData);
  await updateContact(params.contactId, updates)
  return redirect(`/contacts/${params.contactId}`);
}
Loaders and actions can both return a Response (makes sense, since they received a Request!). The redirect helper just makes it easier to return a response that tells the app to change locations.
Without client-side routing, if a server redirected after a POST request, the new page would fetch the latest data and render. As we learned before, React Router emulates this model and automatically revalidates the data on the page after the action. That’s why the sidebar automatically updates when we save the form. The extra revalidation code doesn’t exist without client-side routing, so it doesn’t need to exist with client client-side routing either!
Changing the user’s avatar
WordPress’s avatars use a service called Gravatar. Users who want their avatar changed must do this on their site. This is usually cumbersome for the user.
A nicer solution is to upload an image via our edit form. Therefore, we need to install a third-party plugin that enables the user to upload their picture.
“Simple Local Avatars” enables the user to choose a picture from WordPress’s Media Library. To make the process user-friendly, we will handle this in our React app:
- We upload an image to the “Media Library”.
- We set the uploaded image as an avatar for the contact.
👉 Install plugin
Go to the Plugins > Add New in the WordPress admin and search for “Simple Local Avatars“, install and activate it.
👉 Add a new API function
/* existing code */
export async function updateContact(id, user) {
  try {
    const result = wp.users().id(id).update(
      user.media_id
          ? { ...user, simple_local_avatar: { media_id: user.media_id } }
          : user
    )
    return result
  } catch (error) {
    console.error(error)
  }
}

export async function uploadImage({ file, title, alt_text }) {
  try {
    const result = await wp.media().file(file).create({
      title,
      alt_text,
    })
    return result
  } catch (error) {
    console.error(error)
  }
}
👉 Update the edit component
      <div className="col-md-12">
        <label htmlFor="avatar" className="form-label">
          Avatar
        </label>
        <input type="file" className="form-control" id="avatar" name="avatar" />
      </div>
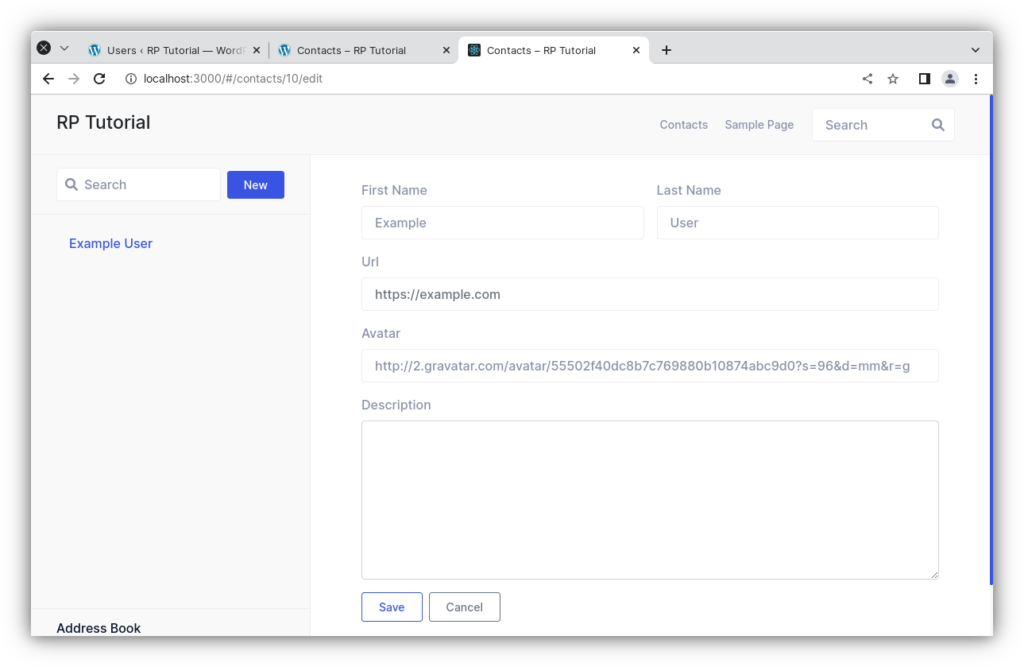
Your form should look like this:

👉 Update the edit action
export async function action({ request, params }) {
  const formData = await request.formData()
  const updates = Object.fromEntries(formData)
  if (updates.avatar) {
    const inputFile = document.getElementById('avatar')
    const uploadedImage = await uploadImage({
      alt_text: `${updates.first_name} ${updates.last_name}'s profile image`,
      file: inputFile.files[0],
      title: `${updates.first_name} ${updates.last_name}`,
    })
    await updateContact(params.contactId, {
      ...updates,
      simple_local_avatar: { media_id: uploadedImage.id }
    })
  } else {
    await updateContact(params.contactId, updates)
  }
  return redirect(`/contacts/${params.contactId}`)
In case the user adds an image of herself, we upload the image first. We add a simple_local_avatar property to our updates, where we tell the image id of the contact’s avatar. Simple Local Avatar expects an object in the given form.
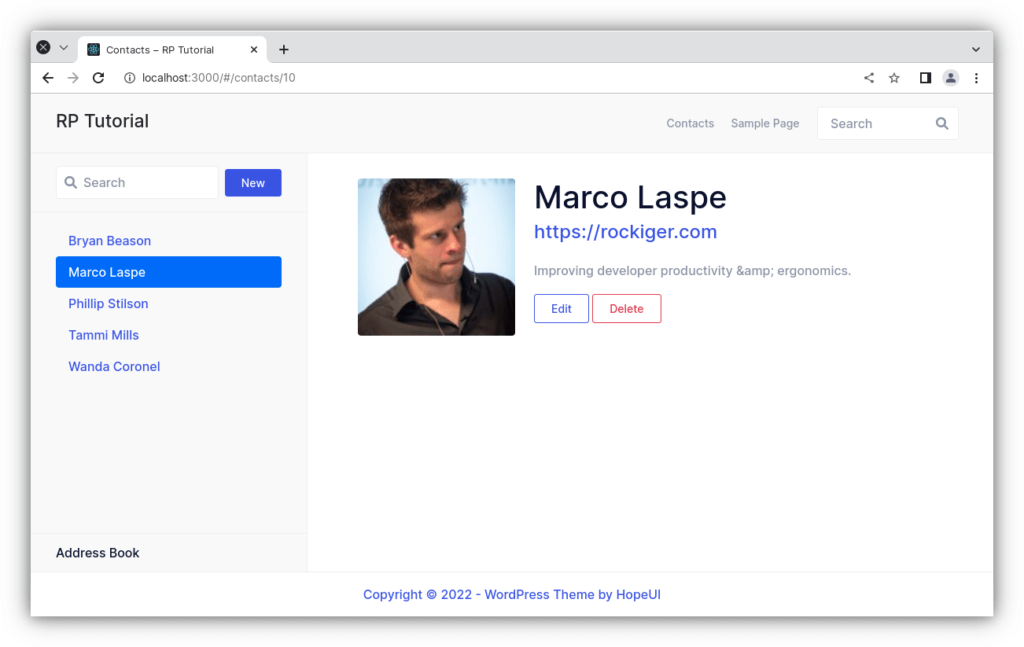
👉 Update the contact component
<img
  alt={`${contact?.name}'s avatar`}
  className="rounded"
  height={200}
  src={
    contact.simple_local_avatar?.full ||
    contact?.avatar_urls['96'] ||
    null
  }
  width={200}
/>
We use the default WordPress avatar only as a fallback now. Instead, we use the uploaded image, that is provided by Simple Local Avatar.
The result:
Creating new contacts
Now that we know how to edit contacts, let’s use this knowledge to create new contacts.
👉 Add the new route
/* existing imports */
import NewContact, { action as newAction } from './routes/new'
/* existing code */
{ path: 'contacts/new', element: <NewContact />, action: newAction },
/* existing code */
👉 Link to the new contact page
import { Form, Link, Outlet, redirect, useLoaderData } from 'react-router-dom'
import { getContacts } from '../api'

export async function action() {
  return redirect(`/contacts/new`)
}

/* existing code */
👉 Add the create page UI and action
import { Form, redirect, useLoaderData } from 'react-router-dom'
import { createContact, uploadImage } from '../api'

export async function action({ request }) {
  const formData = await request.formData()
  const updates = Object.fromEntries(formData)
  if (updates.avatar) {
    const inputFile = document.getElementById('avatar')
    const uploadedImage = await uploadImage({
      alt_text: `${updates.first_name} ${updates.last_name}'s profile image`,
      file: inputFile.files[0],
      title: `${updates.first_name} ${updates.last_name}`,
    })
    const response = await createContact({
      ...updates,
      simple_local_avatar: { media_id: uploadedImage.id },
    })
    return redirect(`/contacts/${response.id}`)
  } else {
    const response = await createContact(updates)
    return redirect(`/contacts/${response.id}`)
  }
}

export default function NewContact() {
  const contact = useLoaderData()
  return (
    <Form className="row g-3" method="post" id="contact-form">
      <div className="col-md-6">
        <label htmlFor="username" className="form-label">
          Username
        </label>
        <input
          className="form-control"
          id="username"
          name="username"
          placeholder="username"
          type="text"
        />
      </div>
      <div className="col-md-6">
        <label htmlFor="email" className="form-label">
          E-Mail
        </label>
        <input
          className="form-control"
          id="email"
          name="email"
          placeholder="name@example.com"
          type="email"
        />
      </div>
      <div className="col-md-6">
        <label htmlFor="first" className="form-label">
          First Name
        </label>
        <input
          className="form-control"
          defaultValue={contact?.first_name}
          id="first"
          name="first_name"
          placeholder="First"
          type="text"
        />
      </div>
      <div className="col-md-6">
        <label htmlFor="last" className="form-label">
          Last Name
        </label>
        <input
          className="form-control"
          defaultValue={contact?.last_name}
          id="last"
          name="last_name"
          placeholder="Last"
          type="text"
        />
      </div>
      <div className="col-md-6">
        <label htmlFor="password" className="form-label">
          Password
        </label>
        <input
          className="form-control"
          id="password"
          name="password"
          placeholder="e.g. UX6YRGANRinm785"
          type="text"
        />
      </div>
      <div className="col-6">
        <label htmlFor="url" className="form-label">
          Url
        </label>
        <input
          className="form-control"
          defaultValue={contact?.url}
          id="url"
          name="url"
          placeholder="https://example.com"
          type="text"
        />
      </div>
      <div className="col-md-6">
        <label htmlFor="avatar" className="form-label">
          Avatar
        </label>
        <input type="file" className="form-control" id="avatar" name="avatar" />
      </div>
      <div className="col-md-12">
        <label htmlFor="description" className="form-label">
          Description
        </label>
        <textarea
          className="form-control"
          defaultValue={contact?.description}
          id="description"
          name="description"
          rows={6}
          style={{ height: 'calc(5 * 2.5rem' }}
        />
      </div>
      <div className="col-12 d-flex gap-2">
        <button type="submit" className="btn btn-outline-primary">
          Save
        </button>
        <button type="button" className="btn btn-outline-secondary">
          Cancel
        </button>
      </div>
    </Form>
  )
}
Nothing new here. The new.jsx is very similar to edit.jsx. We add a few inputs and call createContact instead of updateContact. Otherwise, it is almost the same. (Indeed we tried to reuse edit.jsx first, but it quickly became very messy.)
👉 Add a handful of contacts
Create some real or fake contacts. Be creative :).
Active Link Styling
Now that we have a bunch of records, it’s not clear which one we’re looking at in the sidebar. We can use NavLink to fix this.
import {
  Form,
  NavLink,
  Outlet,
  redirect,
  useLoaderData,
} from 'react-router-dom'

/* existing code */

<ul className="nav nav-pills nav-fill flex-column">
  {contacts.map((contact) => (
    <li key={contact.id} className="nav-item text-start">
      <NavLink
        className={({ isActive, isPending }) =>
          `nav-link ${
            isActive ? 'active' : isPending ? 'disabled' : ''
          }`
        }
        to={`contacts/${contact.id}`}
      >
        {contact.name ? <>{contact.name}</> : <i>No Name</i>}{' '}
        {contact.favorite && <span>★</span>}
      </NavLink>
    </li>
  )}
</ul>

/* existing code */
Note that we are passing a function to className. When the user is at the URL in the <NavLink>, then isActive will be true. When it’s about to be active (the data is still loading) then isPending will be true. This allows us to easily indicate where the user is, as well as provide immediate feedback on links that have been clicked but we’re still waiting for data to load.
Global Pending UI
As the user navigates the app, React Router will leave the old page up as data is loading for the next page. You may have noticed the app feels a little unresponsive as you click between the list. Let’s provide the user with some feedback so the app doesn’t feel unresponsive.
React Router is managing all of the state behind the scenes and reveals the pieces of it you need to build dynamic web apps. In this case, we’ll use the useNavigation hook.
👉 useNavigation to add global pending UI
import {
  // existing code
  useNavigation,
} from "react-router-dom";

// existing code

export default function Root() {
  const { contacts } = useLoaderData();
  const navigation = useNavigation();

  return (
    <>
      <div id="sidebar">
        <h1>
          Address Book
          <div
            className={`spinner-border spinner-border-sm ms-auto ${
              navigation.state === 'loading' ? 'visible' : 'invisible'
            } `}
            role="status"
          >
            <span className="visually-hidden">Loading...</span>
          </div>
        </h1>
        {/* existing code */}
      </div>
      <div id="detail">
        <Outlet />
      </div>
    </>
  );
}
useNavigation returns the current navigation state: it can be one of "idle" | "submitting" | "loading".
In our case, we add a bootstrap spinner element to the sidebar of the app if we’re not idle. You could do anything you want, though, like show a gray overlay or loading bar across the top.
Deleting Records
If we review code in the contact route, we can find the delete button looks like this:
<Form
  method="post"
  action="destroy"
  onSubmit={(event) => {
    if (
      !confirm(
        "Please confirm you want to delete this record."
      )
    ) {
      event.preventDefault();
    }
  }}
>
  <button type="submit">Delete</button>
</Form>
Note the action points to "destroy". Like <Link to>, <Form action> can take a relative value. Since the form is rendered in contact/:contactId, then a relative action with destroy will submit the form to contact/:contactId/destroy when clicked.
At this point, you should know everything you need to know to make the delete button work. Maybe give it a shot before moving on? You’ll need:
- A new route
- An
actionat that route - add a
deleteContactinsrc/api.js
👉Add API function
export async function deleteContact(id) {
  try {
    const result = await wp.users().id(id).delete({ force: true, reassign: 0 })
    return result
  } catch (error) {
    console.error(error)
  }
}
The user deletion is pretty straightforward. Note that the parameters are mandatory. force must be set to true, because Users don’t support a trash bin, like other WordPress content – so we must force it. The reassign parameter is an id of the user that will inherit the content (Post, Pages, etc.) of the deleted user.
👉 Create the “destroy” route module
touch src/routes/destroy.jsx
👉 Add the destroy action
import { redirect } from "react-router-dom";
import { deleteContact } from "../api";

export async function action({ params }) {
  await deleteContact(params.contactId);
  return redirect("/");
}
👉 Add the destroy route to the route config
/* existing code */
import { action as destroyAction } from "./routes/destroy";

const router = createHashRouter([
  {
    path: "/",
    /* existing root route props */
    children: [
      /* existing routes */
      {
        path: "contacts/:contactId/destroy",
        action: destroyAction,
      },
    ],
  },
]);

/* existing code */
Alright, navigate to a record, and click the “Delete” button. It works!
😅 I’m still confused why this all works
When the user clicks the submit button:
<Form>prevents the default browser behavior of sending a new POST request to the server, but instead emulates the browser by creating a POST request with client-side routing- The
<Form action="destroy">matches the new route at"contacts/:contactId/destroy"and sends it the request - After the action redirects, React Router calls all of the loaders for the data on the page to get the latest values (this is “revalidation”).
useLoaderDatareturns new values and causes the components to update!
Add a form, add an action, and React Router does the rest.
Contextual Errors
Just for kicks, throw an error in the destroy action:
export async function action({ params }) {
  throw new Error("oh dang!");
  await deleteContact(params.contactId);
  return redirect("/");
}
Recognize that screen? It’s our errorElement from before. The user, however, can’t really do anything to recover from this screen except to hit refresh.
Let’s create a contextual error message for the destroy route:
[
  /* other routes */
  {
    path: "contacts/:contactId/destroy",
    action: destroyAction,
    errorElement: <div>Oops! There was an error.</div>,
  },
];
Now try it again:
Same error component, but our user now has more options than slamming refresh, they can continue to interact with the parts of the page that aren’t having trouble 🙌
Because the destroy route has its own errorElement and is a child of the root route, the error will render there instead of the root. As you probably noticed, these errors bubble up to the nearest errorElement. Add as many or as few as you like, as long as you’ve got one at the root.
You can remove the error from the destroy action now.
Index Routes
When we load up the app, you’ll notice a big blank page on the right side of our list.
When a route has children, and you’re at the parent route’s path, the <Outlet> has nothing to render because no children match. You can think of index routes as the default child route to fill in that space.
👉 Create the index route module
touch src/routes/index.jsx
👉 Fill in the index component’s elements
Feel free to copy & paste, nothing special here.
export default function Index() {
  return (
    <p id="zero-state" className="mt-5 text-center">
      This is a demo for ReactPress.
      <br />
      Check out{' '}
      <a href="https://rockiger.com/reactpress">
        the docs at rockiger.com/reactpress
      </a>
      .
    </p>
  )
}
👉 Configure the index route
// existing code
import Index from "./routes/index";

const router = createHashRouter([
  {
    path: "/",
    element: <Root />,
    errorElement: <ErrorPage />,
    loader: rootLoader,
    action: rootAction,
    children: [
      { index: true, element: <Index /> },
      /* existing routes */
    ],
  },
]);
Note the { index:true } instead of { path: "" }. That tells the router to match and render this route when the user is at the parent route’s exact path, so there are no other child routes to render in the <Outlet>.
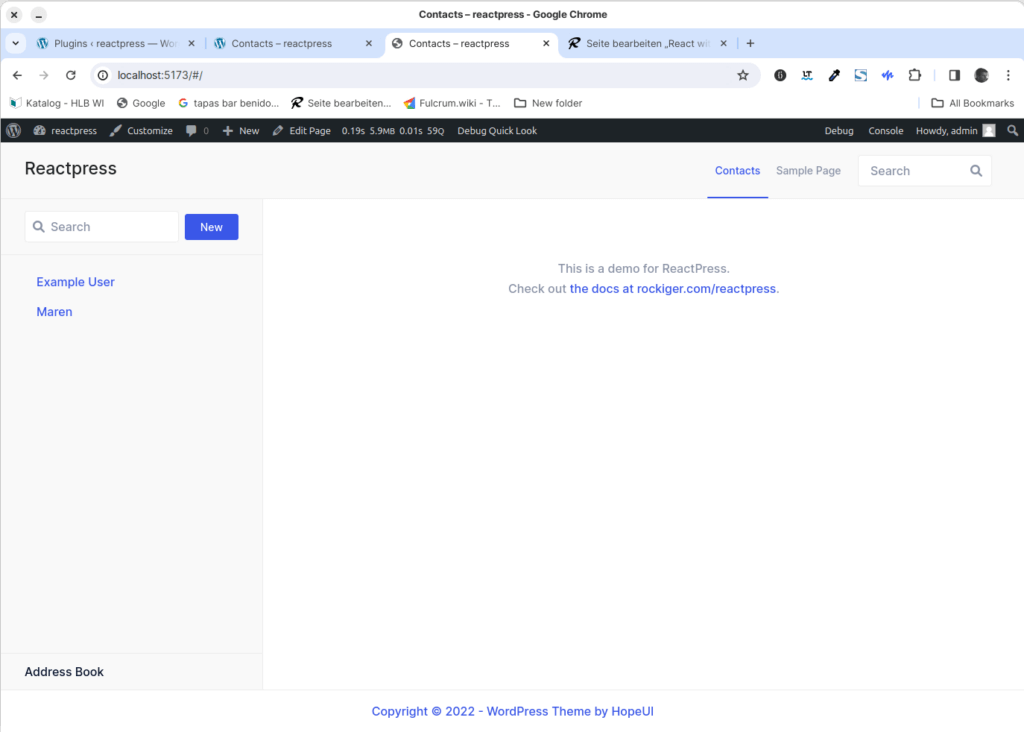
Voila! No more blank space. It’s common to put dashboards, stats, feeds, etc. at index routes. They can participate in data loading as well.
Cancel Button
On the edit page we’ve got a cancel button that doesn’t do anything yet. We’d like it to do the same thing as the browser’s back button.
We’ll need a click handler on the button as well as useNavigate from React Router.
👉 Add the cancel button click handler with useNavigate
import { Form, redirect, useLoaderData, useNavigate } from 'react-router-dom'

/* existing code */

export default function EditContact() {
  const contact = useLoaderData()
  const navigate = useNavigate()

  return (
    <Form className="row g-3" method="post" id="contact-form">
      {/* existing code */}

      <div className="col-12 d-flex gap-2">
        <button type="submit" className="btn btn-outline-primary">
          Save
        </button>
        <button
          className="btn btn-outline-secondary"
          type="button"
          onClick={() => navigate(-1)}
        >
          Cancel
        </button>
      </div>
    </Form>
  )
}
Now when the user clicks “Cancel”, they’ll be sent back one entry in the browser’s history.
🧐 Why is there no
event.preventDefaulton the button?
A <button type="button">, while seemingly redundant, is the HTML way of preventing a button from submitting its form.
Two more features to go. We’re on the home stretch!
URL Search Params and GET Submissions
All of our interactive UI so far have been either links that change the URL or forms that post data to actions. The search field is interesting because it’s a mix of both: it’s a form but it only changes the URL, it doesn’t change data.
Right now it’s just a normal HTML <form>, not a React Router <Form>. Let’s see what the browser does with it by default:
👉 Type a name into the search field and hit the enter key
Note the browser’s URL now contains your query in the URL as URLSearchParams:
http://127.0.0.1:5173/?q=marco
If we review the search form, it looks like this:
<form id="search-form" role="search">
  <input
    id="q"
    aria-label="Search contacts"
    placeholder="Search"
    type="search"
    name="q"
  />
  <div className="sr-only" aria-live="polite"></div>
</form>
As we’ve seen before, browsers can serialize forms by the name attribute of it’s input elements. The name of this input is q, that’s why the URL has ?q=. If we named it search the URL would be ?search=.
Note that this form is different from the others we’ve used, it does not have <form method="post">. The default method is "get". That means when the browser creates the request for the next document, it doesn’t put the form data into the request POST body, but into the URLSearchParams of a GET request.
GET Submissions with Client Side Routing
Let’s use client-side routing to submit this form and filter the list in our existing loader.
👉 Change <form> to <Form>
<Form
  className="d-flex search-form"
  id="search-form"
  role="search"
  type="search"
>
  <i className="fa fa-search" aria-hidden="true"></i>
  <input
    id="q"
    aria-label="Search contacts"
    placeholder="Search"
    type="search"
    name="q"
  />
  <div className="sr-only" aria-live="polite"></div>
</Form>
👉 Filter the list if there are URLSearchParams
export async function loader({ request }) {
  const url = new URL(request.url);
  const q = url.searchParams.get("q");
  const contacts = await getContacts(q);
  return { contacts };
}
Because this is a GET, not a POST, React Router does not call the action. Submitting a GET form is the same as clicking a link: only the URL changes. That’s why the code we added for filtering is in the loader, not the action of this route.
This also means it’s a normal page navigation. You can click the back button to get back to where you were.
Synchronizing URLs to Form State
There are a couple of UX issues here that we can take care of quickly.
- If you click back after a search, the form field still has the value you entered even though the list is no longer filtered.
- If you refresh the page after searching, the form field no longer has the value in it, even though the list is filtered
In other words, the URL and our form state are out of sync.
👉 Return q from your loader and set it as the search field default value
// existing code

export async function loader({ request }) {
  const url = new URL(request.url)
  const q = url.searchParams.get('q')
  const contacts = await getContacts(q)
  return { contacts, q }
}

export default function Root() {
  const { contacts, q } = useLoaderData()
  const navigation = useNavigation()
  return (
    <>
      <div id="sidebar">
        <h1>
          <NavLink to="/">Address Book</NavLink>
          <div
            className={`spinner-border spinner-border-sm ms-auto ${
              navigation.state === 'loading' ? 'visible' : 'invisible'
            } `}
            role="status"
          >
            <span className="visually-hidden">Loading...</span>
          </div>
        </h1>
        <div>
          <Form
            className="d-flex search-form"
            id="search-form"
            role="search">
            <i className="fa fa-search" aria-hidden="true"></i>
            <input
              id="q"
              aria-label="Search contacts"
              placeholder="Search"
              type="search"
              name="q"
              defaultValue={q}
            />
            {/* existing code */}
          </Form>
  /* existing code */
That solves problem (2). If you refresh the page now, the input field will show the query.
Now for problem (1), clicking the back button and updating the input. We can bring in useEffect from React to manipulate the form’s state in the DOM directly.
👉 Synchronize input value with the URL Search Params
import { useEffect } from "react"

// existing code

export default function Root() {
  const { contacts, q } = useLoaderData();
  const navigation = useNavigation();

  useEffect(() => {
    document.getElementById("q").value = q
  }, [q])

  // existing code
}
🤔 Shouldn’t you use a controlled component and React State for this?
You could certainly do this as a controlled component, but you’ll end up with more complexity for the same behavior. You don’t control the URL, the user does with the back/forward buttons. There would be more synchronization points with a controlled component.
Submitting Forms onChange
We’ve got a product decision to make here. For this UI, we’d probably rather have the filtering happen on every key stroke instead of when the form is explicitly submitted.
We’ve seen useNavigate already, we’ll use its cousin, useSubmit, for this.
// existing code
import {
  // existing code
  useSubmit,
} from 'react-router-dom'

//existing code

export default function Root() {
  const { contacts, q } = useLoaderData()
  const navigation = useNavigation()
  const submit = useSubmit()

  useEffect(() => {
    document.getElementById('q').value = q
  }, [q])

  return (
    <>
      <div id="sidebar">
        {/* existing code */}
        <div>
          <Form className="d-flex search-form" id="search-form" role="search">
            <i className="fa fa-search" aria-hidden="true"></i>
            <input
              id="q"
              aria-label="Search contacts"
              placeholder="Search"
              type="search"
              name="q"
              defaultValue={q}
              onChange={(event) => submit(event.currentTarget.form)}
            />
            {/* existing code */}
          </Form>
          {/* existing code */}
        </div>
        {/* existing code */}
      </div>
      {/* existing code */}
    </>
  )
}
Now as you type, the form is submitted automatically!
Note the argument to submit. We’re passing in event.currentTarget.form. The currentTarget is the DOM node the event is attached to, and the currentTarget.form is the input’s parent form node. The submit function will serialize and submit any form you pass to it.
Managing the History Stack
Now that the form is submitted for every key stroke, if we type the characters “seba” and then delete them with backspace, we end up with 7 new entries in the stack 😂. We definitely don’t want this.
We can avoid this by replacing the current entry in the history stack with the next page, instead of pushing into it.
👉 Use replace in submit
// existing code

onChange={(event) => {
  const isFirstSearch = q == null;
  submit(event.currentTarget.form, {
    replace: !isFirstSearch,
  });
}}

// existing code
We only want to replace search results, not the page before we started searching, so we do a quick check if this is the first search or not and then decide to replace.
Each keystroke no longer creates new entries, so the user can click back out of the search results without having to click it 7 times 😅.
Our root errorElement is catching this unexpected error as we try to render a null contact. Nice, the error was properly handled, but we can do better!
Whenever you have an expected error case in a loader or action–like the data not existing–you can throw. The call stack will break, React Router will catch it, and the error path is rendered instead. We won’t even try to render a null contact.
👉 Throw a 404 response in the loader
Not Found Data
What happens if the contact we’re trying to load doesn’t exist?
Our root errorElement is catching this unexpected error as we try to render a null contact. Nice, the error was properly handled, but we can do better!
Whenever you have an expected error case in a loader or action–like the data not existing–you can throw. The call stack will break, React Router will catch it, and the error path is rendered instead. We won’t even try to render a null contact.
👉 Throw a 404 response in the loader
export async function loader({ params }) {
  const contact = await getContact(params.contactId)
  if (contact.code) {
    throw new Response('', {
      status: 404,
      statusText: contact.message,
    })
  }
  return contact
}
Instead of hitting a render error, we avoid the component completely and render the error path instead, telling the user something more specific.
This keeps your happy paths, happy. Your route elements don’t need to concern themselves with error and loading states.
Pathless Routes
One last thing. The last error page we saw would be better if it rendered inside the root outlet, instead of the whole page. In fact, every error in all of our child routes would be better in the outlet, then the user has more options than hitting refresh.
We’d like it to look like this:
We could add the error element to every one of the child routes but, since it’s all the same error page, this isn’t recommended.
There’s a cleaner way. Routes can be used without a path, which lets them participate in the UI layout without requiring new path segments in the URL. Check it out:
👉 Wrap the child routes in a pathless route
createHashRouter([
  {
    path: '/',
    element: <Root />,
    errorElement: <ErrorPage />,
    loader: rootLoader,
    action: rootAction,
    children: [
      {
        errorElement: <ErrorPage />,
        children: [
          /* rest of the routes */
        ],
      },
    ],
  },
])
When any errors are thrown in the child routes, our new pathless route will catch it and render, preserving the root route’s UI!
Show changes in local WordPress
👉 Build the app again
npm run build
Change to your local WordPress installation where you added the Contact page (in our case it’s http://rp-tutorial.local/contacts). And you should see our app on the page. Depending on if you are logged in, you will see the contacts or not.
Authentication
Currently, everybody can see our app. This is not desirable because unregistered users won’t see any contacts in our app, as long as these contacts don’t have published any posts. To change that situation, we will allow the app only to administrators and editors.
👉 Restrict access to the page that embeds the React app
Go to the edit view of the Contacts page and change the visibility to “Private“. Click on “Update“.
WordPress uses a concept of Roles, designed to give the site owner the ability to control what users can and cannot do within the site. WordPress has six pre-defined roles: Super Admin, Administrator, Editor, Author, Contributor, and Subscriber.
With restricting the visibility of the page only Administrators and Editors can view our app anymore.
👉 Install LH Private Content Login plugin
Go to Plugins > Add New, and enter LH Private Content Login in the search field. Install and activate it.
Open a private browser window, open the Contacts and you should be redirected to the WordPress login page.
We chose LH Private Content Login because of its simplicity. However, there are many other plugins you could use to change user roles and capabilities. Some could even give you other visibility states to pages so that also other user roles could see the page. You are welcome to search the WordPress plugin directory to find alternatives.
Reflect on the user roles in our app
In our app, any user has access to all features, even if she doesn’t have the capabilities in the WordPress API. To reflect that, we will only show the ability to create new users to admins. Editing of users will also be restricted to admins, except for the user’s own profile.
👉 Show “New” button only to admins
/* global reactPress */

/* existing code */

  </Form>
  {reactPress?.user?.roles?.includes('administrator') && (
    <Form method="post">
      <button className="btn hopeui_style-button" type="submit">
        New
      </button>
    </Form>
  )}
</div>
<nav>
{/* existing code */}
👉 Redirect to the error page if the user wants to access the “New” page
If a user doesn’t have the ‘Administrator‘ role, we show him an error.
/* global reactPress */

/* existing code */

export default function NewContact() {
  const contact = useLoaderData()

  if (!reactPress?.user?.roles?.includes('administrator') ) {
    throw new Response('', {
      status: 403,
      statusText: 'You do not have permission to access this page.',
    })
  }

  return (

  /* existing code */
👉 Show “Edit” and “Delete” buttons only to admins and the user itself
/* global reactPress */
/* existing code */
<p>{contact.description ? contact.description : <> </>}</p>
{(reactPress?.user?.roles?.includes('administrator') ||
reactPress?.user?.ID === contact?.id) && (
<div className="d-flex">
<Form action="edit">
<button className="btn btn-outline-primary" type="submit">
Edit
</button>
</Form>
<Form
method="post"
action="destroy"
onSubmit={(event) => {
if (
!window.confirm(
'Please confirm you want to delete this record.'
)
) {
event.preventDefault()
}
}}
>
<button className="btn btn-outline-danger" type="submit">
Delete
</button>
</Form>
</div>
)}
</div>
/* existing code */
👉 Redirect to the error page if the user wants to edit or delete another user
/* global reactPress */

/* existing code */

export default function EditContact() {
  const contact = useLoaderData()
  const navigate = useNavigate()

  if (
    !reactPress?.user?.roles?.includes('administrator') &&
    reactPress?.user?.ID !== contact?.id
  ) {
    throw new Response('', {
      status: 403,
      statusText: 'You do not have permission to access this page.',
    })
  }

  return (

  /* existing code */
Give it a test run. Open up the app on the dev server. On my machine, it is located at http://localhost:5173/#/. You should not see the “New” button anymore, and the ability to edit/delete users should also be removed.
Fire up the developer tools console of your browser. Give the current user an admin role.
reactPress.user.roles.push('administrator')
Click on a contact and all buttons should appear again.
Keep in mind, this is only for user convenience. The real authentication takes place at the API level. Remove the admin role again, add the editor role, and change the user id to 1.
reactPress.user.roles.pop('administrator')
reactPress.user.ID = 1
Navigate to the user with id 1 (via the app, NOT the address bar) the edit buttons should be there again. All the other users should still be ‘naked‘.
More modern use of reactPress variable
Using the reactPress constant from the window object to start a new ReactPress project may feel outdated and result in messy code. However, it is a convenient way of accessing the reactPress variable.
To strike a balance, the recommended approach is to alias the variable as a service. A file should be created within the project structure where the variable is declared and exported, making it available for import into project files when needed.
👉 Create reactPress.js service
touch src/reactPress.js
const reactPress = window.reactPress
// uncomment next line if you want the user to have admin rights
// reactPress.user.roles.push('administrator')

export default reactPress
👉 Update all the files that use the reactPress variable
We will do this only for the contact component. Feel free to change all other occurrences of reactPress 🙂
/* existing imports */
import reactPress from '../reactPress'

/* existing code */
Give editors the right capabilities
On DEV, we only used an admin user to fetch data from the WordPress API. Admins have the capabilities to do (almost) anything on a WordPress site. For our app, we also want editors to list all users. We need to add another plugin to give editors this capability.
👉 Create an editor
The users we created earlier all have the role “subscriber”
👉 Install PublishPress Capabilities plugin
You should be familiar with how to do this by now. Search for ‘PublishPress Capabilities’ in the plugin directory.
👉 Add “list_users” capability to editors
Navigate to Capabilities > Capabilties, choose “Editor” in the dropdown menu, switch to the “Users” tab, select the “list users” checkbox, and save the changes.
Release the app to production
Finally, we want to deploy our app to production. This should feel very familiar because we did we made these steps before. Naturally, we need a WordPress server to host our app.
👉 Re-build the app and test if everything works as expected on LOCAL
Build the app in the terminal again. Refresh the contacts page and check if it works.
👉 Create a WordPress site with the same plugins and theme
You need a running WordPress site where you can upload the ReactPress app. Install the “HopeUI” theme and all the plugins we installed in this tutorial:
- ReactPress
- Simple Local Avatars
- LH Private Content Login
- PublishPress Capabilities (don’t forget to edit the capabilities)
👉 Upload the dist folder to the ‘reactpress’ directory of the PROD environment
Access your PROD server via FTP or SSH, navigate to wp-content/reactpress/apps and create a folder called contacts. Copy the build folder of your app to that newly created folder. Just to be clear: Copy the folder including its content, not only content. The folder structure should look something like this:
/contacts
 └── dist
     └── ...
👉 Add a “Contacts” page with visibility set to private
Add a new page to the React app in the ReactPress settings. Then navigate to this site in the WordPress admin and set the visibility to private.
👉 Enjoy your app
That’s it! Thanks for giving ReactPress a shot. We hope this tutorial gives you a solid start to building great user experiences. There’s a lot more you can do with React and WordPress:
- use GraphQL instead of the REST API,
- create dedicated content types,
- build whole online communities,
to name just a few. So make sure to check out all the REST-related WordPress docs and WordPress plugins with their almost endless possibilities 😀
Great tutorial.
There are some issues here, happy to make a PR.
– Edit page, inputs need `name` props.
– WPAPI using vite: Define global e.g. `window.global = window;`
– contact vs contacts
Thanks for your comment. I will have to redo the tutorial. I change it to vite without a lot of consideration when CRA did stop working. Did you encounter other problems?
I run npx create-vite. Everything worked on local, yet once copy dist folder to production wordpress, wordpress didn’t render the app. Also tried generate build folder and copy it to production. didn’t work. Please
Please post help requests on WordPress.org/plugins/reactpress and describe your problem in detail. Every step you took and what the problem is. Nobody can help you, if you just it didn’t work.