If you want to use client-side routing with ReactPress, you need to make sure, that client-side routing doesn’t collide with the server-side routing of your WordPress installation.
Client-side routing without clean URLs (Recommended)
The easiest way to achieve this is to use router mechanisms that don’t send the URL to the server. React-Router provides <HashRouter>, <HistoryRouter> and <MemoryRouter> for these situations, which you can use instead of <BrowserRouter>.
These routers are especially useful, if you need routing and want to use your React app in more than one page or on the homepage of your website. On the downside, they don’t provide a way to have deep link with clean URLs.
If you can live with deep links that look like: example.com/base-url/#/subpage, we highly recommend using <HashRouter>. It provides almost clean URLs and will make your life much easier using ReactPress.
Using these routers has different trade-offs. Refer to the React Router documentation for more information on which router component is best for you.
Client-side routing with clean URLs
ReactPress provides the ability to use <BrowserRouter> with clean URLs. <BrowserRouter> lets you store the current location in the browser’s address bar using clean URLs and to navigate using the browser’s built-in history stack.
Using client-side routing with clean URLs has one warning: The WordPress page of the React app you are using can’t have any subfolders. If you have a page URL: [your-domain]/parent. You can’t reach a page at [your-domain]/parent/children. As React-Router would catch it.
The same holds true for the homepage of your WordPress website.
Set up your app in ReactPress
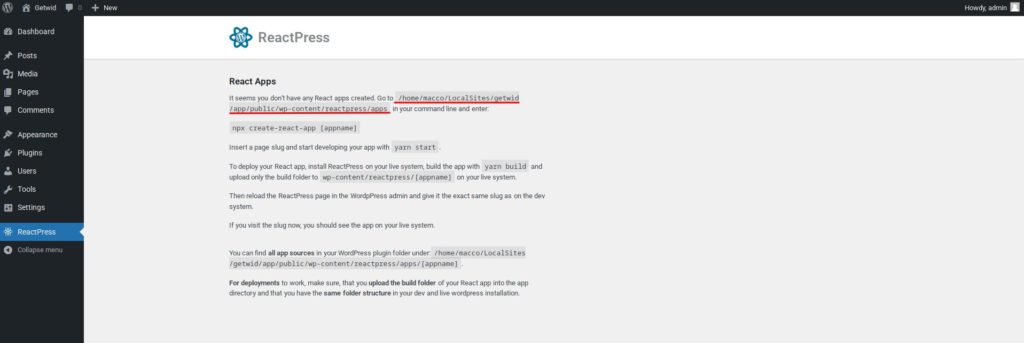
That information out of the way, let’s create a new React app with React-Router. This assumes that you have a running local WordPress dev system and ReactPress already installed. Change to the apps directory of ReactPress and create your React app. You find the path to the apps directory in the ReactPress admin page.

cd [path-to-your-app-directory]
npx create-react-app [your-appname]
cd [your-appname]
yarn add react-router-dom
Go back to the ReactPress admin, reload the page, and you should see your React app.

Add a page slug for your app (this may take a while), build the app in the command line and check if app shows on the page. Now we can develop our React app.
Configure the React app
Open the src/index.js of your React app in your text editor. Import BrowserRouter from react-router-dom and wrap your app with <BrowserRouter basename={'/[slug-to-your-app-page]'}>.
// index.js
import React from 'react'
import ReactDOM from 'react-dom/client'
import { BrowserRouter } from 'react-router-dom'
import './index.css'
import App from './App'
import reportWebVitals from './reportWebVitals'

const root = ReactDOM.createRoot(document.getElementById('root'))
root.render(
  <React.StrictMode>
    <BrowserRouter basename={'/demo'}>
      <App />
    </BrowserRouter>
  </React.StrictMode>
)

// If you want to start measuring performance in your app, pass a function
// to log results (for example: reportWebVitals(console.log))
// or send to an analytics endpoint. Learn more: https://bit.ly/CRA-vitals
reportWebVitals()
Now you can use React Router anywhere in your app! But what does the basename property actually do? basename sets the base URL for all locations. If your app is served from a sub-directory (your WordPress page) on your server, you’ll want to set this to the sub-directory. A properly formatted basename should have a leading slash, but no trailing slash.
Build a simple React app
For a simple example, open src/App.js and replace the default markup with some routes:
import * as React from "react";
import { Routes, Route, Link } from "react-router-dom";
import "./App.css";

export default function App() {
  return (
    <div className="App">
      <h1>Welcome to ReactPress with React Router!</h1>
      <Routes>
        <Route path="/" element={<Home />} />
        <Route path="about" element={<About />} />
      </Routes>
    </div>
  );
}
Now, still in src/App.js, create your route components:
// App.js

...

function Home() {
  return (
    <>
      <main>
        <h2>Welcome to the homepage!</h2>
        <p>You can do this, I believe in you.</p>
      </main>
      <nav>
        <Link to="/about">About</Link>
      </nav>
    </>
  );
}

function About() {
  return (
    <>
      <main>
        <h2>Who are we?</h2>
        <p>
          That feels like an existential question, don't you
          think?
        </p>
      </main>
      <nav>
        <Link to="/">Home</Link>
      </nav>
    </>
  );
}
Go ahead and start your app by running npm start, go to http://localhost:3000/[slug-to-your-app-page]/ and you should see the Home route when your app starts running. Click the “About” link to see your <About> route, and voilà! You’ve successfully set up React Router within ReactPress 🥳

Now go back to the admin area for your app and check the “Use client-side routing” option. Build your React app with yarn build and visit the page of your React app in your development system’s WordPress.
This tutorial is based on React-Router’s Installation page CC 4.0