In my decades of wrestling with computers, I’ve rarely encountered a tool as beautifully simple and powerful as fzf. Like a well-trained bird dog that knows exactly where to point, this fuzzy finder cuts through the chaos of your file system with uncanny precision.
At its core, fzf is a straightforward beast: it helps you find things. But calling it just a search tool would be like calling a sharp hunting knife just a piece of metal. It’s an instrument of liberation for anyone who spends their days in the terminal’s trenches.
The beauty of fzf lies in its primal simplicity. Install it through your package manager – be it pacman, apt, or dnf – and you’re ready to hunt. Add one line to your shell configuration file, and suddenly, your terminal becomes as intuitive as tracking deer through fresh snow.
bash
# Set up fzf key bindings and fuzzy completion
eval "$(fzf --bash)"
zsh
# Set up fzf key bindings and fuzzy completion
source <(fzf --zsh)
fish
# Set up fzf key bindings
fzf --fish | source
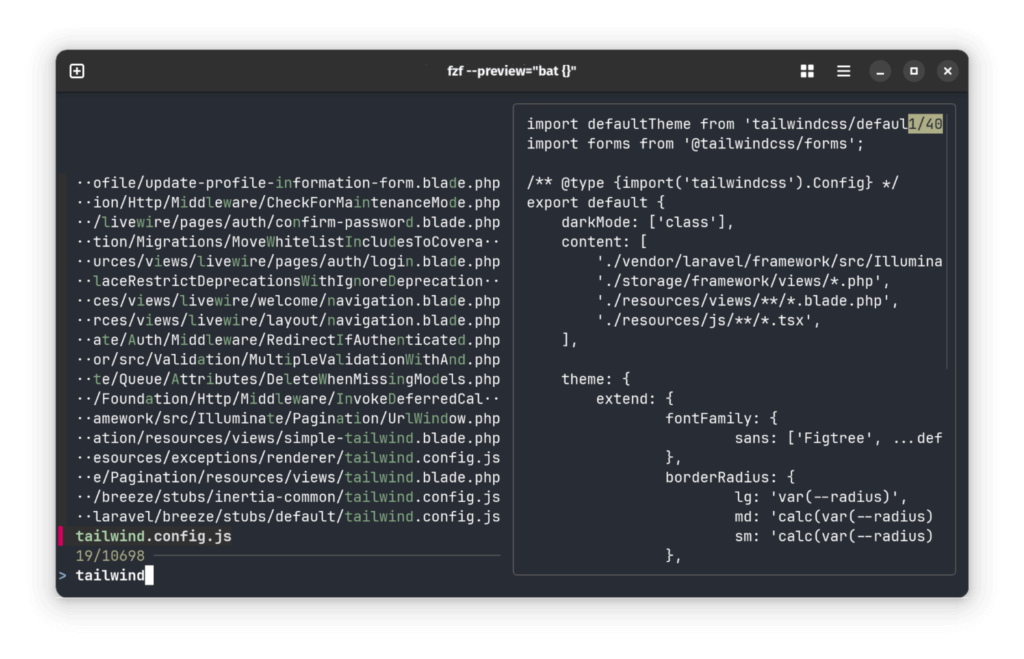
Let me tell you about its true power. Type fzf and you’re presented with a live, breathing list of every file in your realm. Start typing, and the list narrows like a hawk focusing on its prey. But the real magic happens when you combine it with other tools. Pair it with cat or bat for syntax-highlighted previews, and suddenly, you’re not just hunting blind — you’re seeing through the trees.
fzf --preview="bat --color=always {}"
Want to open multiple files in your editor? fzf lets you tab through your choices like picking the best cuts from a freshly dressed deer. The -m flag turns it into a multi-selection tool, as natural as gathering mushrooms in a fertile forest.
## opens several files in nano
nano $(fzf -m --preview="bat --color=always {}")
The shell integration is where fzf truly sings. CD through directories with the grace of a mountain lion, using nothing but ‘**’ and tab.
I’ve seen countless tools come and go, each promising to revolutionize the command line. Most of them are as useful as a screen door on a submarine. But fzf? It’s like a good knife or a trusted compass — the more you use it, the more indispensable it becomes.
In the end, fzf isn’t just another Unix tool. It’s a testament to the beauty of doing one thing extraordinarily well. Like the perfect cast on a spring creek or the clean kill of a well-placed shot, it’s about efficiency, precision, and the quiet satisfaction of a job well done.
Install it. Learn it. Use it. Your terminal will never feel the same again.
I bought a Dell G7 17 – 7700 in April 2020. After now half a year, I would like to present my experiences with this laptop here.
Requirements
First, I would like to briefly discuss my requirements. These were:
Linux compatibility. The thing should simply run. I have little desire to fiddle around a lot during installation. I want to install Ubuntu and good.
Usable battery life. It’s important to me to be able to work on the train for a few hours when I’m traveling. I don’t need a laptop that can last a whole workday without power. Most of the time my laptop resides on my desk anyway.
A good keyboard. If you have to work with the laptop directly on your lap, then the keyboard should be comfortable to type on. I personally like keyboards with a short stroke.
Neat memory. Since I work a lot with React and Webpack, and have many browser windows open, I need quite a bit of memory. 16 GB is actually the absolute minimum, 32 GB is probably better.
Large hard drive. The same goes for the hard drive, in the end it should probably be a terabyte, so that you don’t use up all the space right away with virtual machines and a few videos.
17 inch display. I personally like 17 inch (about 43 cm) laptops. They replace a second monitor on the desk and when you also have them on your lap, they don’t wreck your neck and shoulders as much as smaller models.
Neat workmanship. The laptop should already have a certain value. I don’t need a model made of full aluminum, but it shouldn’t look like a lunchbox in the schoolyard either.
With the above-mentioned requirements, I first went on a search. The many cheap devices that are available in the 17 inch class were already ruled out, since the keyboard and case are usually of subterranean quality.
Unfortunately, the devices from Linux-specialized providers were also not for me. Their 17-inch laptops are mostly white-label gaming laptops that are very heavy, very thick, very expensive and look quite cheap.
Let’s get one thing straight: I’m a big fan of Linux-focused vendors. I would buy a desktop PC from such a vendor any day. Unfortunately, laptops are not made of standard components like desktop PCs, and therefore, it is very difficult for niche vendors to develop their own laptops
After some research, I came to the conclusion to buy a gaming laptop that is not designed for absolute maximum performance, but rather for casual gamers. Gaming laptops usually have decent hardware built-in and have a usable keyboard, because gamers have to hack into the keys all the time.
I decided on the Dell G7 17 – 7700 because it has a slightly raised display, which I thought would give me a small ergonomic advantage when working on my lap.
After about 7 days the laptop arrived at my home. The first thing I did was to test the Ubuntu suitability with a live stick. After a few minutes without any problems, I went to the installation. I threw down Windows and installed Ubuntu 20.04.
I simply took the default settings from the Ubuntu installer. Good as I am, I also turned on the hard disk encryption.
After a short time, the installation was fixed and ready. The G7 and was thus ready for use and could also be used already well
By the way, I didn’t change anything on the BIOS but left the factory settings as they are.
Rework
Where there is a lot of light, there is also shadow. It was possible to start working with the G7 directly after the Ubuntu installation. But nevertheless, there were a few small things that needed to be optimized.
The Nvidia driver installed by default by the Ubuntu installer didn’t work with my multi-monitor setup. I have two other monitors at my workstation beside the laptop monitor that I connect to, once via USB, once via HDMI. With the proprietary Nvidia driver, it simply did not work to address more than one monitor.
Since gaming is not a priority for me, I looked around for other solutions. My first idea was to use the open-source Nouveau driver. And to my luck, this one worked right away. Its advantage is that it fits much better into the Ubuntu/Gnome settings
The worse performance with graphics-heavy applications doesn’t matter much to me
Besides the problems with the graphics card, only the fingerprint reader was not working. However, I didn’t bother with it any further.
Screen
The Full HD screen is very bright and you can even work in the sun without problems. The maximum resolution is 1920 x 1080.
Battery life
I am quite satisfied with the battery life. It’s certainly enough for a train journey. I don’t need to be able to use my laptop all day without charging it. 5 to 6 hours are always possible with normal use.
Keyboard & touchpad
The keyboard and touchpad are the secret highlights of the G7. The key travel is very low, which I personally like, and works buttery smooth
The large touchpad is made of glass and is very pleasant to use. Unlike cheap laptops, you glide over the surface very easily. The multitouch support with Ubuntu is at least sufficient for my requirements.
Conclusion
In conclusion, I have to say that I am very satisfied with the G7. It was a real stroke of luck for me. The device is powerful enough, looks good, and has very good ergonomics.
Several ReactPress users struggle with their local WordPress environment to provide the necessary dependencies that are needed to run ReactPress in development mode. Especially Nodejs seems to be a headache for a lot of users. To simplify developing with ReactPress I decided to provide a VirtualBox image that has all prerequisites for ReactPress already installed.
To install the ReactPress Dev-Environment you have to finish 8 steps:
Install Virtualbox
Make sure that you have VirtualBox installed. There are walk-throughs for Ubuntu, Mac OS, and Windows. So I will not repeat the installation process here.
If you don’t have VirtualBox installed, do that first and come back here afterward.
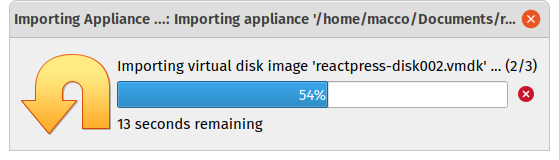
Import the ReactPress Dev-Environment into VirtualBox
Click on the folder icon and choose the downloaded image reactpress.ova.
Click on Next > and you see an overview of the image. Unless you know exactly what you are doing, you shouldn’t change anything.
Click on Import. VirtualBox will import your image.
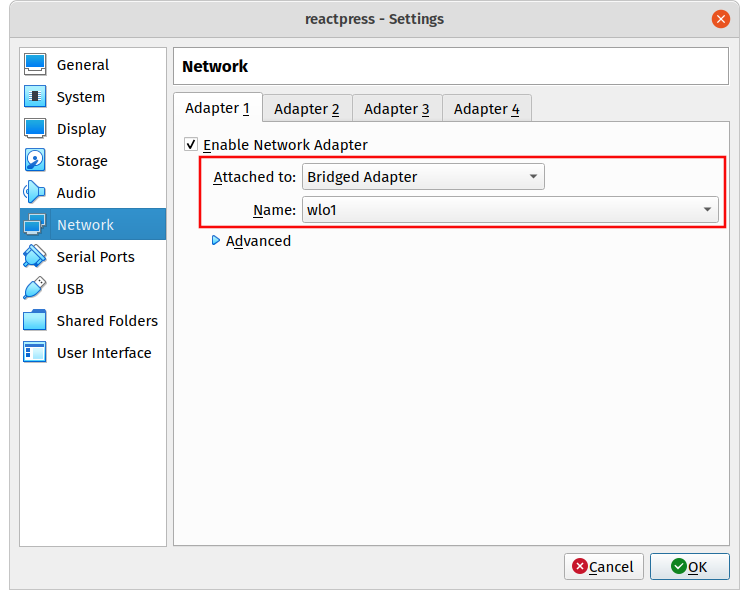
Check the network settings
Select the newly created virtual machine and open the settings of that machine. Then check the Network tab and make sure that Attached to: select field is set to Bridged Adapter and the Name of the network adapter is set.
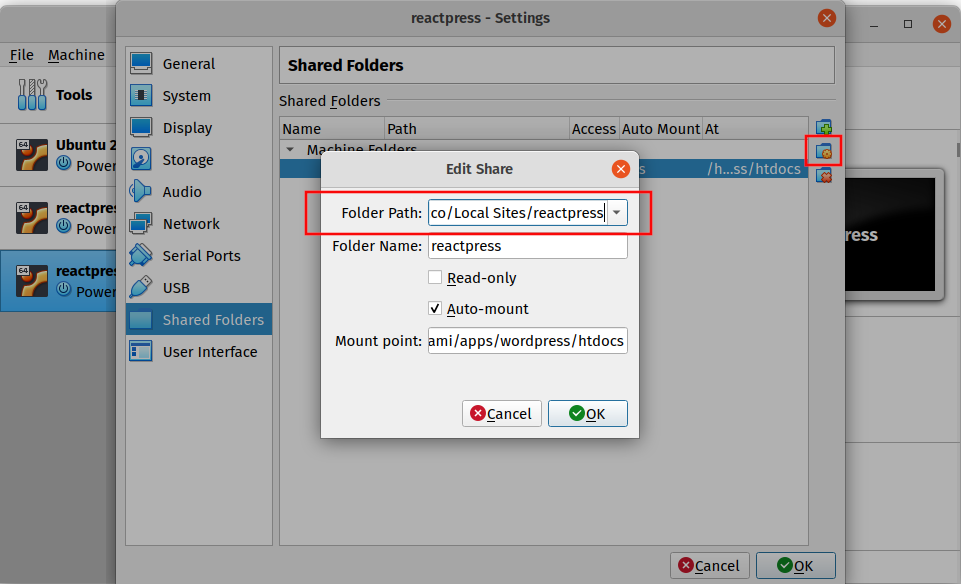
Set the shared folder
Next, go to the Shared Folders tab and select the existing entry and click on the folder icon in the middle. In the opened window change the Folder Path on the host machine to the location where you want your project code to be.
The selected folder should be empty. It will later hold the complete WordPress installation of your project including your React-app.
Click OK to close the settings.
Allow symlinks in shared folders
To work WordPress installation needs the ability to create symlinks. Therefore you need to open a terminal and enter the following code.
# Linux / Mac OS
VBoxManage setextradata "reactpress" VBoxInternal2/SharedFoldersEnableSymlinksCreate/reactpress 1

# Windows
"C:\Program Files\Oracle\VirtualBox\VBoxManage.exe" setextradata "reactpress" VBoxInternal2/SharedFoldersEnableSymlinksCreate/reactpress 1
This command assumes that you didn’t change the name of your virtual machine nor the shared folder before. Now your virtual machine is ready to start.
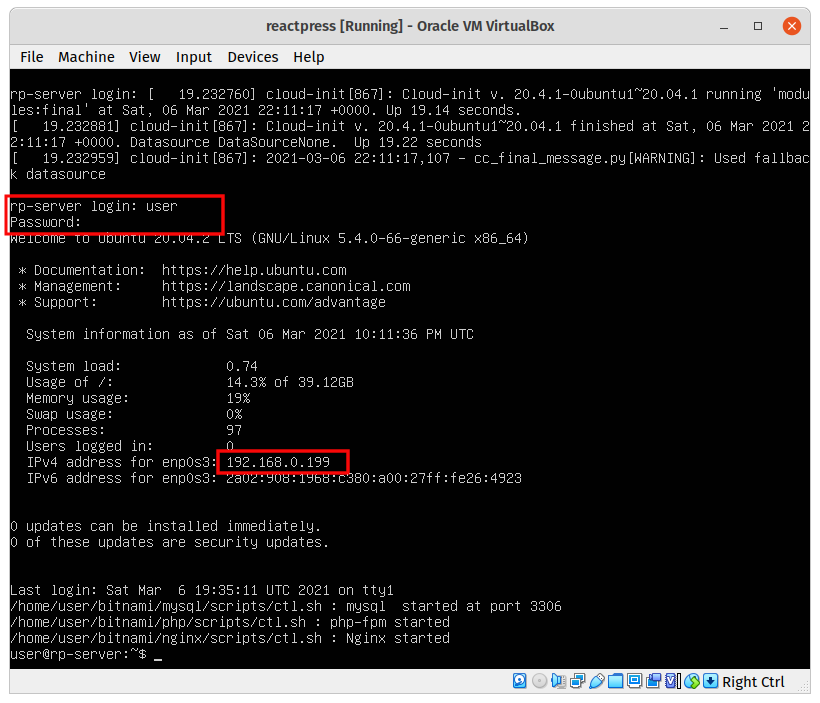
Note the IP-Address of the virtual maschine
Start your virtual machine and wait till the login appears. Enter the following credentials:
Username:
user
Password:
pass
After logging in, you will be shown the IP address of the virtual machine among other information. Make a note of it.
The running VirtuaBox image for ReactPress
If the IP address doesn’t show or you want access at a later point you can enter the following command in your VM:
ip addr show
Reset the WordPress installation
Because the shared folder we created earlier is still empty we need to reset the WordPress installation. Therefore just execute the script ./reset_wordpress. (Please execute this script only once. Otherwise all your changes to the WP installation will be overwritten.)
Now a WP environment with access to Nodejs will be available to you at the IP address you wrote down at port 8080, e.g. http://192.168.0.74:8080/wp-admin.
The credentials for the admin are the same as for the VM:
I would suggest, that from now on you startup your ReactPress VM in headless mode and don’t reboot or power off your VM, but always save the state of it. This way you don’t have to re-login to start the development server.
You can even start and stop the virtual machine from the command line with:
The quest for the ideal React state management is one of the most discussed topics in the React community. If you look around, you will often come across the following question: How do I manage my state in React?[1]n00b Q: Why would you ever use React w/o Hooks?
Especially devs who previously worked with other frameworks like Angular or Vue ask themselves how to manage their state in React. Often the question comes about an official solution for state management.[2]State management in React?
Another question devs have been asking since the introduction of the Context API and Hooks API in React 16.8 is deciding between Redux or the Context API with useState/useReducer to manage its global state.[3]Is redux really a good idea?
I would like to answer both questions in the following. For this purpose, I did some research in the community and got the opinion of many experienced React developers.
What is State Management?
Before we begin, however, I would like to clarify a few basic points. Before we can solve the question of the right state management, I think we need a definition of what exactly state management means.
The state describes the condition of an application at a given point in time.
The UI is the visual representation of the state of an application. As described above, State represents the state of an application at a given point in time.[6]Wieruch, Robin -React State Management
It follows that: In React the State is a data structure that reflects the current state of the UI.
The State can consist of different kinds of data:
A Boolean that decides whether a sidebar is open or not.
All this data could be managed either locally (i.e. within a component using React hooks or setState) or globally.
In this case, managing means saving and changing the state, as well as displaying the state through the UI.
Is there an official / recommended state management solution like other frameworks in React?
Yes and no. With the setState method and the useState/useReducer hooks, there is a React-specific solution for local state management within a component. With this, you can already create reasonably complex apps[7]Should I use a state management library like Redux or MobX?.
There is no quasi-official solution for global state management like NgRx for Angular or Vuex for Vue. Here, you are spoiled for choice with React. Some solutions are specialized for certain parts of the application state (e.g. react-query), some are general solutions (e.g. Redux).[8]Erikon, Mark – When (and when not) to reach for Redux
So how does one choose the appropriate state management solution?
I would like to deliberately leave Navigation-State out of this consideration. Any React application that has more than two views should rely on a routing library like react-router. From my point of view, handling the browser API is way too complex to manage it by yourself.
If we assume that the main difficulty is coordinating the subtypes, then the first thing we should ask ourselves is: what types of state do we need to manage in our (React) application? How complex is my state? How often does it change? And then we decide which solution is best for us.
Below you can see a diagram of my decision process.
Decision process for choosing the right state management solution.
useState
The first question we ask is: Is our State shared by more than two components? If we answer in the negative, the question is: does our state have complex update logic, i.e. is the new state dependent on the old state or are multiple subvalues changed? If we also deny this, we use local state with useState.
For example, if we have a simple counter with one component, the use of local state with useState is sufficient.
When the Counter component is rendered for the first time, the useState hook is initialized with intialCount. As return value we get the state variable count and the update function setCount.
To change count, we need to call setCount with a new value. Whenever we call setCount, the counter component is re-rendered.
If we want to set the new value of count based on the old one, we should pass setCount a simple update function that passes the new value of count as its return value.
Now, unlike our example above, if our state has complex update logic, it makes sense to useReducer.
As described above, complex in this context means that a change of the state must change many values of the state or that the state depends on the previous state.
First we define an initial state and a pure reducer function. This consumes a state and an action and returns a new state.
To use useReducer in our counter component, we proceed similarly as with useState: We initialize useReducer with initalState and reducer. After the initialization we get back the state and a dispatch function. The dispatch function is used to request a state change from the reducer. For this we call dispatch with an appropriate action.
Accordingly, the onClick handlers of the buttons no longer contain their own logic, but only request the state change via dispatch.
If we look at the right part of the decision diagram, that is, if we answered yes to the question “Is the state shared by more than two components?”, we are faced with the question of whether our global state changes frequently? If we can answer this in the negative, the Context API can make our lives easier.
A typical example is the login state of a user. Which is needed in many different components.
// Auth.js
const AuthContext = createContext({username: '', role: ''});

export function useAuth() {
  const context = useContext(AuthContext);
  if (!context) {
    throw new Error('useAuth must be used within a AuthProvider');
  }
  return context;
}

export function AuthProvider({ children }) {
  const [user, setUser] = useState({username: '', role: ''});

  return (
    <AuthContext.Provider value={{ user }}>
      {children}
    </AuthContext.Provider>
  );
}

// App.js
export function App() {
  return (
    <AuthProvider>
      <Component />
    </AuthProvider>
  );
}

// Component.js
export function Component() {
  const { user } = useAuth()
  if (user?.role === 'ADMIN') {
    return <AdminView />
  } else {
    return <UserView />
  }
}
In our code example, we initialize the context with createContext, which we make available to all children of the AuthProvider component.
With the custom hook useAuth, the child components can access the state. This allows us to save unnecessary prop drilling.
Looking at our decision diagram again, we see that we have used up React’s board resources. We are now moving into the area where it may be worthwhile to use external state management solutions.
If an application uses global state primarily to retrieve, cache, and update data residing on a server, it is recommended to use a specialized data management solution.[9]Dodds, Kent – Application State Managment with React
In an admin interface, we often need to display many different data in different views. Managing this data efficiently can be anything but trivial.[10]Overview react-query
In the following, I would like to show a simple example using react-query.
// App.js
import { QueryClient, QueryClientProvider} from 'react-query'

const queryClient = new QueryClient()

export default function App() {
  return (
    <QueryClientProvider client={queryClient}>
      <Component />
    </QueryClientProvider>
  )
}

// Component.js
import { useQuery } from 'react-query'

function Component() {
  const { isLoading, error, data } = useQuery('issues', () =>
    fetch('https://api.github.com/repos/rockiger/metado').then(res =>
      res.json()
    )
  )

  if (isLoading) return 'Loading...'

  if (error) return 'An error has occurred: ' + error.message

  return (
    <>
      <h1>{data.name}</h1>
      <p>{data.description}</p>
    </>
  );
}
Similar to our context API example, react-query provides us with a context provider and a custom hook.
With the custom hook useQuery we can now fetch the data we need. For this we pass useQuery a unique name and the actual fetch function. We get back the data (status, error, content) we need to display.
The real highlight is that react-query takes over the management for us. It makes sure that the data is cached and updated automatically. If we use the same query issues in a second component, react-query will not execute the query multiple times, but will fall back on the cached data.[11]Important Defaults – react-query
In addition, the provided context provider is optimized to prevent unnecessary re-rendering of components. Implementing this functionality yourself is far from straightforward.[12]On Cache Invalidation – Why is it hard?
But what do you do if the state is shared by multiple components, changes frequently, and is not mainly server state?
For example, to manage the state in a text editor with many buttons. This is where Redux comes in. Redux is very efficient, has a large ecosystem with many plugins (so-called middleware) and is very well documented.
We reimplement our counter example here again using Redux and the Redux toolkit. It is very similar to the useReducer variant.
First, we initialize our state and our reducer. In our Counter component, we initialize a so-called selector; a function to select a subset of the state. Additionally, we use the useDispatch hook of Redux to be able to command state changes.
Unlike our useReducer variant, we do not need to name an action with a string. Action names are automatically generated by createSlice.
As our simple counter example shows, setting up Redux does require a bit more effort. So that since the official introduction of the Context API in React 16.3, it is mostly not worth the effort for small application.
consistent and defined architectural patterns that can facilitate teamwork
easy debugging through the excellent browser extension
the use of different middleware
many add-ons and good extensibility
the cross-platform and cross-framework usage
depending on the app state, better performance than the Context API
While Redux is the best known and most popular state management solution for React, it is by no means the only one. Alternatives include: MobX, Recoil, RxJS.
There is a lot buzz about Chrome – Googles new Web browser. What I don't understand is why is there so much buzz about a piece of software. When a new version of Opera is released, in my opinion, the most innovative browser of the last years, almost nobody cares. Now Google releases a browser and everybody is going nuts. I want to comment on some statements about Chrome (This will not be technical):
Chrome is a Windows killer: Despite the fact that I don't think the people at Google hate Microsoft, I think Chrome is just a new browser that gives users more opportunities. Firefox did not kill Microsoft either. Just to have a really powerful JavaScript engine doesn't make the choice of the OS redundant. By the way, Microsoft is a dying giant anyway.
Google wants a big chunk of the mobile browser market: I think Google's growth strategy heavily relies on the mobile browser market. As a result for them, it is very important that people have easy access to the mobile web and a good experience using it. Therefore a nice integration between Chrome on the desktop and Android/mobile Chrome would be helpful.
Google never hit a second home run: Which application from Google you use all the time? It is not Orkut, is it? Google is mostly late when they releasing a new application and normally not the first to develop something really new. Although things like Android look very promising they have yet to prove that they can be successful. The same applies to Chrome.
Personally, I think on the desktop PC Chrome will have a hard time competing with the Internet Explorer. Just because a lot of people are too lazy to change their habits. Actually, I would say it is more likely that Firefox users will try out Chrome than IE users. But the release of the new browser means that Google is putting pressure on the market leader what should be a good thing for us customers.