Several ReactPress users struggle with their local WordPress environment to provide the necessary dependencies that are needed to run ReactPress in development mode. Especially Nodejs seems to be a headache for a lot of users. To simplify developing with ReactPress I decided to provide a VirtualBox image that has all prerequisites for ReactPress already installed.
To install the ReactPress Dev-Environment you have to finish 8 steps:
Install Virtualbox
Make sure that you have VirtualBox installed. There are walk-throughs for Ubuntu, Mac OS, and Windows. So I will not repeat the installation process here.
If you don’t have VirtualBox installed, do that first and come back here afterward.
Import the ReactPress Dev-Environment into VirtualBox

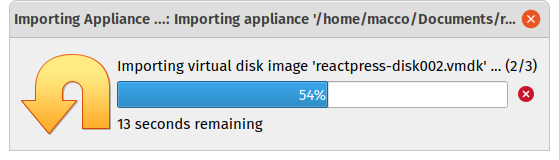
Download the provided VM image from here and open VirtualBox. Import the image by clicking on Import Appliance... in the File menu.
Click on the folder icon and choose the downloaded image reactpress.ova.
Click on Next > and you see an overview of the image. Unless you know exactly what you are doing, you shouldn’t change anything.
Click on Import. VirtualBox will import your image.
Check the network settings
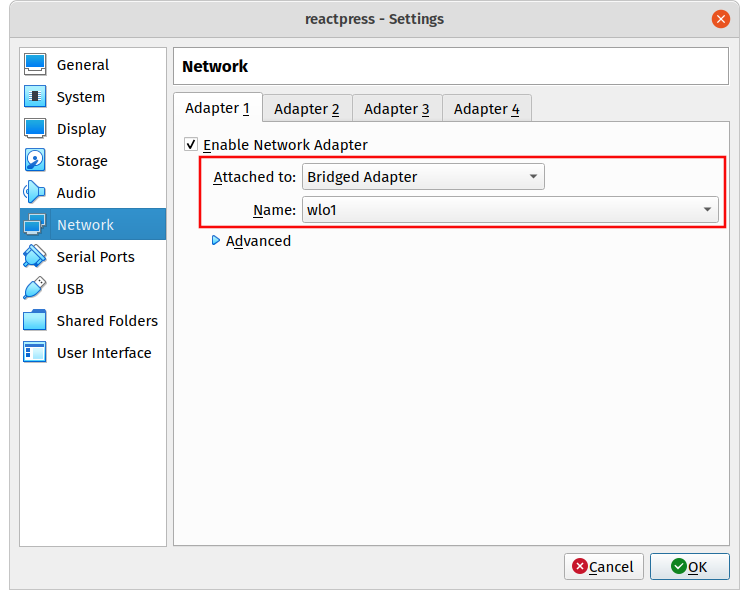
Select the newly created virtual machine and open the settings of that machine. Then check the Network tab and make sure that Attached to: select field is set to Bridged Adapter and the Name of the network adapter is set.
Next, go to the Shared Folders tab and select the existing entry and click on the folder icon in the middle. In the opened window change the Folder Path on the host machine to the location where you want your project code to be.
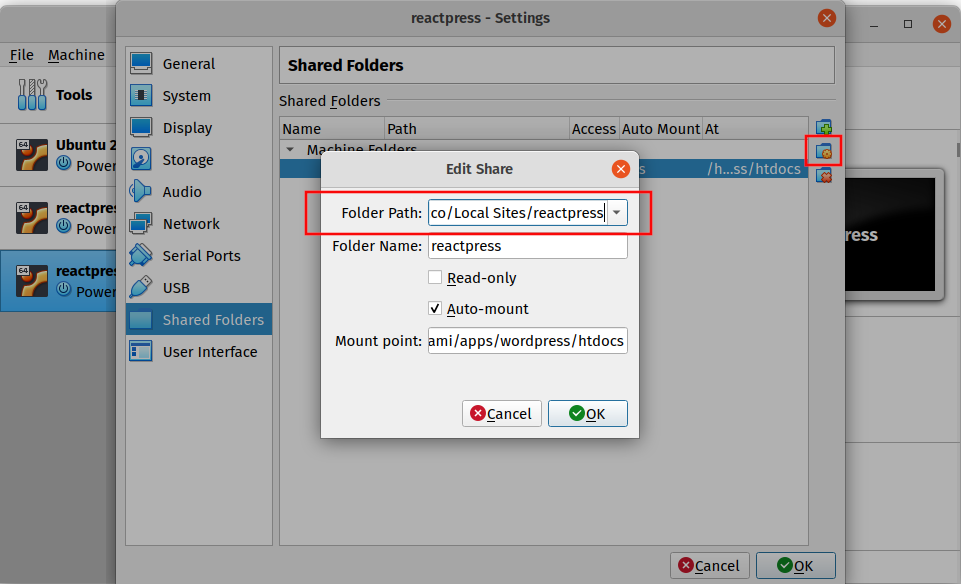
The selected folder should be empty. It will later hold the complete WordPress installation of your project including your React-app.
Click OK to close the settings.
To work WordPress installation needs the ability to create symlinks. Therefore you need to open a terminal and enter the following code.
# Linux / Mac OS
VBoxManage setextradata "reactpress" VBoxInternal2/SharedFoldersEnableSymlinksCreate/reactpress 1

# Windows
"C:\Program Files\Oracle\VirtualBox\VBoxManage.exe" setextradata "reactpress" VBoxInternal2/SharedFoldersEnableSymlinksCreate/reactpress 1
This command assumes that you didn’t change the name of your virtual machine nor the shared folder before. Now your virtual machine is ready to start.
Note the IP-Address of the virtual maschine
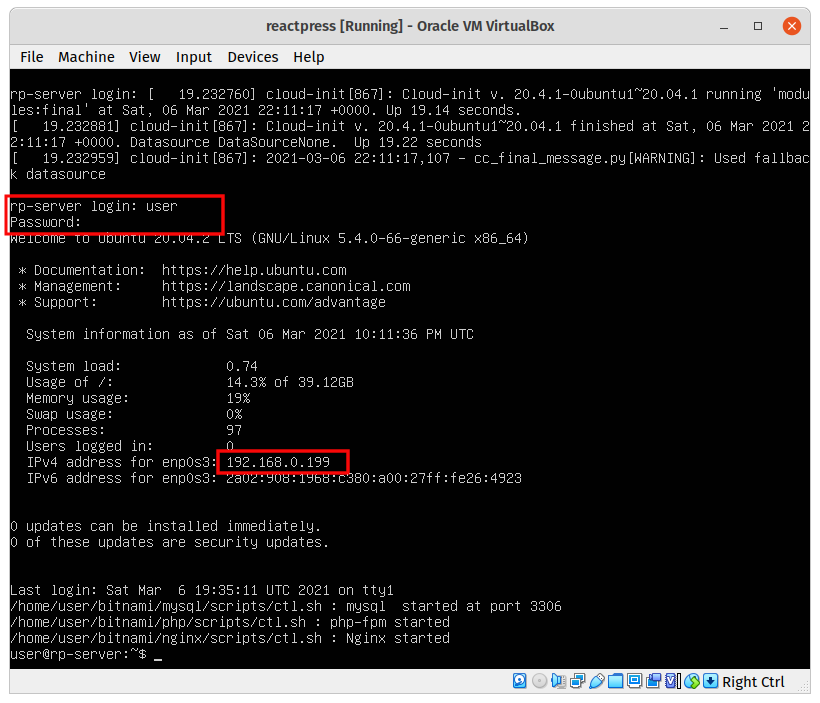
Start your virtual machine and wait till the login appears. Enter the following credentials:
| Username: | user |
| Password: | pass |
After logging in, you will be shown the IP address of the virtual machine among other information. Make a note of it.
If the IP address doesn’t show or you want access at a later point you can enter the following command in your VM:
ip addr show
Reset the WordPress installation
Because the shared folder we created earlier is still empty we need to reset the WordPress installation. Therefore just execute the script ./reset_wordpress. (Please execute this script only once. Otherwise all your changes to the WP installation will be overwritten.)
Now a WP environment with access to Nodejs will be available to you at the IP address you wrote down at port 8080, e.g. http://192.168.0.74:8080/wp-admin.
The credentials for the admin are the same as for the VM:
| Username: | user |
| Password: | pass |
Develop your React app
Now you are ready to use the ReactPress plugin in your WP dev environment. I have written a whole article on how to easily embed React apps into WordPress with it.
I would suggest, that from now on you startup your ReactPress VM in headless mode and don’t reboot or power off your VM, but always save the state of it. This way you don’t have to re-login to start the development server.
You can even start and stop the virtual machine from the command line with:
VBoxManage startvm "reactpress" --type headless

VBoxManage controlvm "reactpress" savestate
Hi, and thank you for doing all of this:) All is good (I think!), I inputted the ./reset_wordpress in VM first and nothing so I opened the c:\Users\Earle> and placed it there. Nothing happened, so I looked at the share files to see if there were any changes and nothing. So, so sorry to comment, but how do I confirm that my work is going to the right place before I begin?
Hello Barbara,
which files are in your shared folder on your host machine? Did you choose a shared folder? In your shared folder should be a whole wordpress installation.
Hi Marco,
Would you mind expanding on “the whole WordPress installation”? Do I have to install WordPress onto my desktop? Or, can I work on a current WP already in my hosting account?
Here the path that I have currently for the shared file: C:\Wordpress\xampp\htdocs\ReactPress\.wordpress
Your instructions do not mention anything about Ubuntu, but the VM code mentions it and your screenshots show it, should I download Ubunto too?
Hi Marco: Since my last message, I decided to delete and start from the beginning “word for word” The good news is that the ip:8080 is functioning. The bad is several: I tried to put .reset_wordpress in both c: and the VM monitor & had error codes!
The Windows iso file is sitting on my desktop as it is 4.53 GBS & will not burn to 8 GB DVD or copy to a 16 GB memory stick. I downloaded a new Windows with Media (several hours) & now am repeating the process as per instructions. I DO NOT KNOW if this is necessary if we already have a workspace in IP:8080 since the iso can not be burned?
Because I usually code in .vscode then look to localhost, do this has been a challenge yet you are trying to make it easier.
So, please take this as constructive feedback for better or for worst!
We appreciate you and appreciate that we can share this with you if you do not mind?
With kind regards,
Barbara
P.S. I canceled running Windows 10 as per the “walk-through” you suggested following because yesterday it took several hours and only updated my desktop. Some guidance here is really needed and I would be grateful since I truly do not understand this part of the process! Thanks, Barbara
OK, so I am at the pretty green twenty twenty-page. looked at the console etc and have no idea how to work in this environment. If you view the VM in the how to start Ubuntu youtube video, it shows a virtual mirror like you never left chrome. What am I doing wrong?
Hello Babara, what I don’t understand how can you have a path like
C:\Wordpress\xampp\htdocs\ReactPress\.wordpressif you use the VM I provide?You should only have one shared folder. This local webserver should run in the VM.
Under the step “Set the shared folder” you should select an empty folder. After the rest of the setup you should have the website files in this folder.
./reset_wordpressshould be executed in the VM not on the host system.If it helps, I created a Video that shows the whole process on Windows WM: https://youtu.be/5-mbbp_Y1yA
1. Hind site is 20/20. It started with an Virtual Box warning that “The shared folder ‘reactpress’ could not be set up: Shared folder path ‘/home/macco/LocalSites/reactpress” is not absolute”
2. This is when I began to question the IOS file and so on.
3. I started to change the path looking to fix the error.
Your video was the blessing because I was not and did not go to documents to create the folder: reactpress and that was the missing part that was needed to make your easy install efforts work!
The video is absolutely necessary for “React for dummies” and I only have one question. How does the ISO fit in and is that part really necessary as that really caused a lot of confusion, plus:
1. It would not burn onto a DVD or USB drive,
2. After a work around, the file load took forever (hours!)
3. And, once it would let me “try to” set up the install from the ISO file, it failed as
Windows requires a key to open. Since I do not have a physical key code, I would never be able to open!
This is not a complaint, just constructive information that you may wish to have or ignore…
Again the key to my install was recognizing that I had to create a document folder and on my own and without the video, I would have never realized that part of the install. THE VIDEO IS A MUST IN YOUR INSTRUCTIONS.
But, back to our project and your video, I could “KISS” you right now but instead I will give you the old 5 star rating for support:)
Everything is perfect and time to build,
Love,
Barbara
Glad, it worked out for you! Thanks for your recommendations.
Regarding your question, I don’t know about which ISO you are talking about. I never wrote something about an ISO.
Cheers
Hi and thanks,
You suggested the walk through for windows and it is discussed there. 2 questions for you:
1. I uploaded a free redux theme that works on my regular site and the frontend of the site is blank. Is this normal?
2. Since I had already been using this theme and it has a url. Can I download it to my desktop, delete your content and unzip it there to work on it?
Barbara
Ha, it only took a couple of tries, but I pulled it off so forget the previous comments. So, I save the state and power out of VM. Do I need to input the symlink and/or the ./reset_wordpress ever again or would that be a “no,no”?
Lovely video on top!
What are you saying here:
You need to enable JavaScript to run this app.
Are you telling me to leave this block alone because it is need to run JavaScript. ORRRRR
Hi Marco,
Since I had not had a reply, just thought that I would mention that everyone already know JS is used for react, but your block message is confusing. Just to make sure I understand that communication correctly, do I need to input that script in my php for some reason. I am already using a Redux framework! Please clarify, Barbara
Hello Barbara,
of course JavaScript is used for React. Please understand, that I can’t answer your React questions here. Please post question in an appropriate forum. Not in this comment section. Your questions have nothing to do with ReactPress nor the provided VM.
Dear, great contribution, but looks like you cant run VirtualBox on Macs with Apple’s M1 chip. I went trough all the steps and got stuck.
Hi Diego,
this could be the case. I don’t know how to change that. Maybe it helps to use a different Paravirtualization Interface in the System-Settings of the VM.
I am planning to publish a new version of ReactPress over the weekend, that will allow you to use create-react-app right in the apps directory.